
Simple School Albums
Tuesday, August 25, 2009
This time of year is so busy. The children are heading back to school, and those of us who are taking care of them anticipate the workload that will come with that. Getting everyone to and from school each day, making sure they have a decent lunch, keeping their extracurricular activities organized, and ensuring that they are caught up with homework is already adding a lot to our plates.
There is also the pressure document their experiences throughout the school year, take pictures, and hold onto their memorabilia. As a scrapbooker, I want my kids to have more mementos from their school years than I did. However, I'm not up for trying to be "supermom" in this area. I would like to find a balance between creating cute albums for them and still having time for other interests I have, too.
I'm also one who gets overwhelmed with clutter, and while I haven't gotten a handle on going through it all efficiently, I'm not just going to let it accumulate.
Here are a few guidelines I've set up for myself. I find that these keep me sane and prevent me from taking all of it and hucking it out the front door:
1 - I'm not going to keep everything. Since there's more than one kid in this household, we'd be up to our ears in paper if I did. My spouse and I pick and choose what we think is the best, the cutest, shows their growth, or is especially memorable. The rest gets put in with our regular recycling.
2 - The kids can keep one or two bulky projects (such as a volcano created out of papier mache, etc.) they created for school, as long as it fits in their rooms. We will take photos of all of them, created scrapbook pages for them, and then the remaining items will have to go.
3 - We will keep things as easy as we can on the first and last days of school. That means we will rise a little earlier to take photos before school. We will take a few photos when we drop them off (since we walk and they don't take the bus), but we won't drive ourselves crazy.
I'm going to focus today on what things I'm putting in my kid's albums, and in another entry I'll show you how I compile the contents of them.
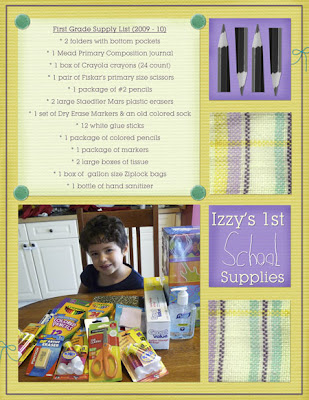
Great albums always start with nice photos, so a couple of weeks before school starts, I try to list what I want pictures of. That generally includes firsts (such as the first day, the first school lunch, first set of supplies, etc.), the walk to school, a picture of the child near or inside the classroom, and any new clothes or backpacks.
Wherever possible, I take pictures before the first day. The less we have to do on that day, the better. Since my hubby had purchased all of Izzy's school supplies early, I piled them on the table, had her sit by them, and snapped a couple of shots. Boom. One less thing to do and one of her "firsts" is already recorded:
Then, when that busy day finally hits, I try to schedule with my hubby so he can take part of the day off. We both keep a camera handy, that way it's not on one person to take all the pictures AND make sure everyone is ready and cleaned up. It reduces a lot of stress. By doing this, we ensure that we get the adorable and important pictures we want for their scrapbooks:

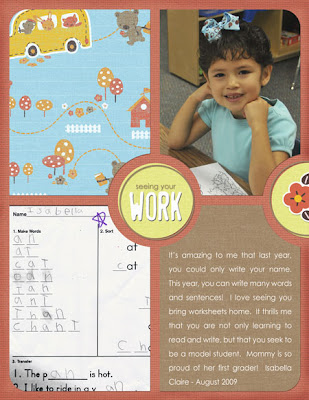
Here's more on my opinion on children's schoolwork and how much of it to keep. There are some people out there who like to keep everything their kid brings home, and for them, that's great. That just doesn't work for me. So, what I do is to go through all of our kid's papers with my husband. We do this once or twice a week. Some weeks, we may not save anything, and some we save a lot. If the child has done multiple versions of the same drawing/or worksheet, we keep only one. We label their work with the child's name, along with the month and year the worksheet or artwork was done. We keep a manila folder for each child, and their papers or photos of projects go in there.
At the end of each school year, I go through their files, pick a few things to slip into a sheet protector, and place those in their albums. These I will intersperse with layouts I've done and their various school pictures. There are some things that I think are really cute, so I scan and save them in a format I can use in Photoshop Elements. From there, I can incorporate them into a layout. I made the following page at the beginning of Izzy's first grade year because it was just so fun. I scanned one of the first worksheets she brought home and used it to chronicle her growth as a student.
That still leaves a fair amount of items in their folders, so when the folders get full, we are planning on starting a box for each child to hold the rest of their work. Those boxes will stay in the garage and we'll eventually give that to them when they are grown.
For me and my crew, this had made things pretty manageable and kept things fun without overwhelming us all. I have also decided not to give into the guilt that some try to place on me about not saving *every* single scrap they bring home. I think in the long run, my kids would rather see that I kept their "greatest hits" instead of loading them down with boxes and boxes of schoolwork.
If you like the kits I used for my pages, here are the links:
The first two layouts, I used Heather T's Yay, School! kit.
For the third page, I used Katie Pertiet's School Days kit.
Thanks for taking time to visit and have a great day!
There is also the pressure document their experiences throughout the school year, take pictures, and hold onto their memorabilia. As a scrapbooker, I want my kids to have more mementos from their school years than I did. However, I'm not up for trying to be "supermom" in this area. I would like to find a balance between creating cute albums for them and still having time for other interests I have, too.
I'm also one who gets overwhelmed with clutter, and while I haven't gotten a handle on going through it all efficiently, I'm not just going to let it accumulate.
Here are a few guidelines I've set up for myself. I find that these keep me sane and prevent me from taking all of it and hucking it out the front door:
1 - I'm not going to keep everything. Since there's more than one kid in this household, we'd be up to our ears in paper if I did. My spouse and I pick and choose what we think is the best, the cutest, shows their growth, or is especially memorable. The rest gets put in with our regular recycling.
2 - The kids can keep one or two bulky projects (such as a volcano created out of papier mache, etc.) they created for school, as long as it fits in their rooms. We will take photos of all of them, created scrapbook pages for them, and then the remaining items will have to go.
3 - We will keep things as easy as we can on the first and last days of school. That means we will rise a little earlier to take photos before school. We will take a few photos when we drop them off (since we walk and they don't take the bus), but we won't drive ourselves crazy.
I'm going to focus today on what things I'm putting in my kid's albums, and in another entry I'll show you how I compile the contents of them.
Great albums always start with nice photos, so a couple of weeks before school starts, I try to list what I want pictures of. That generally includes firsts (such as the first day, the first school lunch, first set of supplies, etc.), the walk to school, a picture of the child near or inside the classroom, and any new clothes or backpacks.
Wherever possible, I take pictures before the first day. The less we have to do on that day, the better. Since my hubby had purchased all of Izzy's school supplies early, I piled them on the table, had her sit by them, and snapped a couple of shots. Boom. One less thing to do and one of her "firsts" is already recorded:

Then, when that busy day finally hits, I try to schedule with my hubby so he can take part of the day off. We both keep a camera handy, that way it's not on one person to take all the pictures AND make sure everyone is ready and cleaned up. It reduces a lot of stress. By doing this, we ensure that we get the adorable and important pictures we want for their scrapbooks:

Here's more on my opinion on children's schoolwork and how much of it to keep. There are some people out there who like to keep everything their kid brings home, and for them, that's great. That just doesn't work for me. So, what I do is to go through all of our kid's papers with my husband. We do this once or twice a week. Some weeks, we may not save anything, and some we save a lot. If the child has done multiple versions of the same drawing/or worksheet, we keep only one. We label their work with the child's name, along with the month and year the worksheet or artwork was done. We keep a manila folder for each child, and their papers or photos of projects go in there.
At the end of each school year, I go through their files, pick a few things to slip into a sheet protector, and place those in their albums. These I will intersperse with layouts I've done and their various school pictures. There are some things that I think are really cute, so I scan and save them in a format I can use in Photoshop Elements. From there, I can incorporate them into a layout. I made the following page at the beginning of Izzy's first grade year because it was just so fun. I scanned one of the first worksheets she brought home and used it to chronicle her growth as a student.

That still leaves a fair amount of items in their folders, so when the folders get full, we are planning on starting a box for each child to hold the rest of their work. Those boxes will stay in the garage and we'll eventually give that to them when they are grown.
For me and my crew, this had made things pretty manageable and kept things fun without overwhelming us all. I have also decided not to give into the guilt that some try to place on me about not saving *every* single scrap they bring home. I think in the long run, my kids would rather see that I kept their "greatest hits" instead of loading them down with boxes and boxes of schoolwork.
If you like the kits I used for my pages, here are the links:
The first two layouts, I used Heather T's Yay, School! kit.
For the third page, I used Katie Pertiet's School Days kit.
Thanks for taking time to visit and have a great day!


