I'm preparing to go to a mixed media art retreat, Art and Soul Colorado, in just a few days. One of the fun things I'm looking forward to is doing trades...in other words, any participant who's interested makes us a small item to trade with others in between classes. Some make artistic trading cards, small figures, or pins. I wanted to do something a little different, so after doing some research about trades, I opted to make these key chains. Out of necessity, I needed to make something that would be light and not too heavy in my luggage, as well something that wouldn't bog me down as I carried my bag of trades around at the retreat.
I was excited to make these, not only because they'd be different, but because they look so cool. They are pretty easy to make if you have everything you need. Here's a supply list if you'd like to your hand at this. For each keychain, you'll need:
-a cork (can be used as long as it's not damaged)
You can get a bag of several corks from amazon: https://www.amazon.com/gp/product/B003XZ54BO/ref=oh_aui_detailpage_o03_s00?ie=UTF8&psc=1
-lobster keychains (also found on Amazon): https://www.amazon.com/gp/product/B06XGMKM6R/ref=oh_aui_detailpage_o05_s00?ie=UTF8&psc=1
-2 small washers (1/2 in or 12.7 mm)
-2 larger washers (3/8 in or 9.5 mm)
-two head screws (also commonly called eyelets)
-small strips of patterned paper, washi tape, or thin ribbon (use your stash!)
A larger, thicker ribbon to put on the bottom of your keychain (cut into a strip about 1/2 - 3/4 in. wide and about 3-4 inches long)
-E6000 glue (the one with the pointy tip, not pictured)
-a toothpick, if you don't have the glue with the pointy tip
-scissors and pinking shears (not pictured)
You can see my video of the process below:
If you'd prefer a step by step without watching the video, just follow the steps below.
Step One: Gluing on the Washers
Using the E6000 glue, adhere one of the large washers to one end of the cork. Allow to dry overnight to prevent headaches when assembling the rest of your keychain(s).
The next day, glue one of the small washers onto the top of the larger washer. Again, allow it to dry overnight.
I let my corks dry overnight in a cake pan lined with plastic wrap. It was an easy and efficient way to let them dry without the corks and washers slipping all over the place.
When the corks have both washer sets completely dry on one side, repeat the process with the other side.
Step Two: Insert the Eyelets/Headscrews
On one end of your cork, start screwing your eyelet into the cork through the hole on the smallest eyelet (don't put any glue down into the hole just yet!). Tighten the eyelet down until it fits flush with the top of the small eyelet. Carefully pull the eyelet back out of your cork.
Once the eyelet is removed, take a toothpick and cover the bottom half of it with the glue. Push the glued-up pick inside the hole you created with your eyelet, then pull it back out. If you have the glue tube with the pointy tip, you can try pushing a bit of glue into the hole with that. When the adhesive inside the hole, screw the eyelet back down into the hole again until it is tightly up against the small washer.
Repeat this process with the glue and another eyelet on the other end. Your key chain should now look like the one in the photo above. Lay flat and allow to dry overnight, one more time.
Step Three: Add the Key Chain Attachment and Washi and/or Patterned Paper
Choose one end, and put on the key chain. I personally liked using lobster keychains, because they have a hook that's quick and easy to attach, but it's possible to thread the standard circular key chains around the eyelet; it just takes a bit longer.
On the same end as the key chain, wrap washi tape on the cork as close as you can to the large washer. Or, if you prefer, take a small, thin strip of digital or traditional patterned paper with the glue. Washi tape is easier to use, since it's self-adhesive, but it's not hard to glue on paper. You can see my key chain below that has paper instead of washi.
I suggest letting key chains made with paper trim dry for a good, long time. Drying time doesn't necessarily take overnight.
Step Five: Add a Ribbon loop
To add your ribbon loop, take your small length of ribbon and cut the ends with pinking shears (which keeps your ribbon from fraying). Fold your ribbon in half, then thread the loop through the eyelet. Take the loose ends of the ribbon and pull them through the loop through the ribbon. Pull the ends securely through the loop and snug the ribbon up through the eyelet. You can see the ribbon as I've looped it through the head screw in the picture above.
The key chain is finished, and making it is pretty easy!! The most time consuming part is the drying time, but once that is done, the rest of the key chain is quick to assemble.
Here's a small sampling of the a few of the key chains I made. I used plaid ribbons for the bottom of the chains, but any ribbon you prefer could easily be substituted.
Thanks for checking out this project and I hope you'll let me know if you give making the key chains a shot.
Hey guys! How is your month going so far? I'm glad May is here, and I can see some fun things coming my way, as well as some difficult things I will have to work my way through this month.
As Mother's Day approaches, I find myself both thankful for the blessing it is to raise my children, and the sadness for the things that are testing my mettle as a mom and a person. I remind myself that the bad things will pass, hopefully there are enough good things that are going on with my family, and that we will end up better people in the end. If you have a mom in your life, please celebrate and honor her, whether you celebrate Mother's Day or not. She will love you for it.
In the midst of everything I have going on, having a bullet journal to plan things out will help me have the most positive and productive month I can.
If this is your first visit to my blog, welcome! Just an FYI, I use the following for digital bullet journaling:
If you'd like to watch my video on this month's planning, here's the video:
Here are my page spreads for this month. At this point, I have only a few to share. There will be more later on, as I'm taking another BuJo doodling class. I hope you'll check back for more pages as the month goes on.
Weekly page spreads:
I wanted to throw this one in here, showing a better way to use my Bitmoji avatar, since the last one was a bit smaller than I intended. I made the Bitmoji a larger and more prominent in the page design here and like this a lot better. If you wanna see how I created stickers with my Bitmoji, check out last month's post.
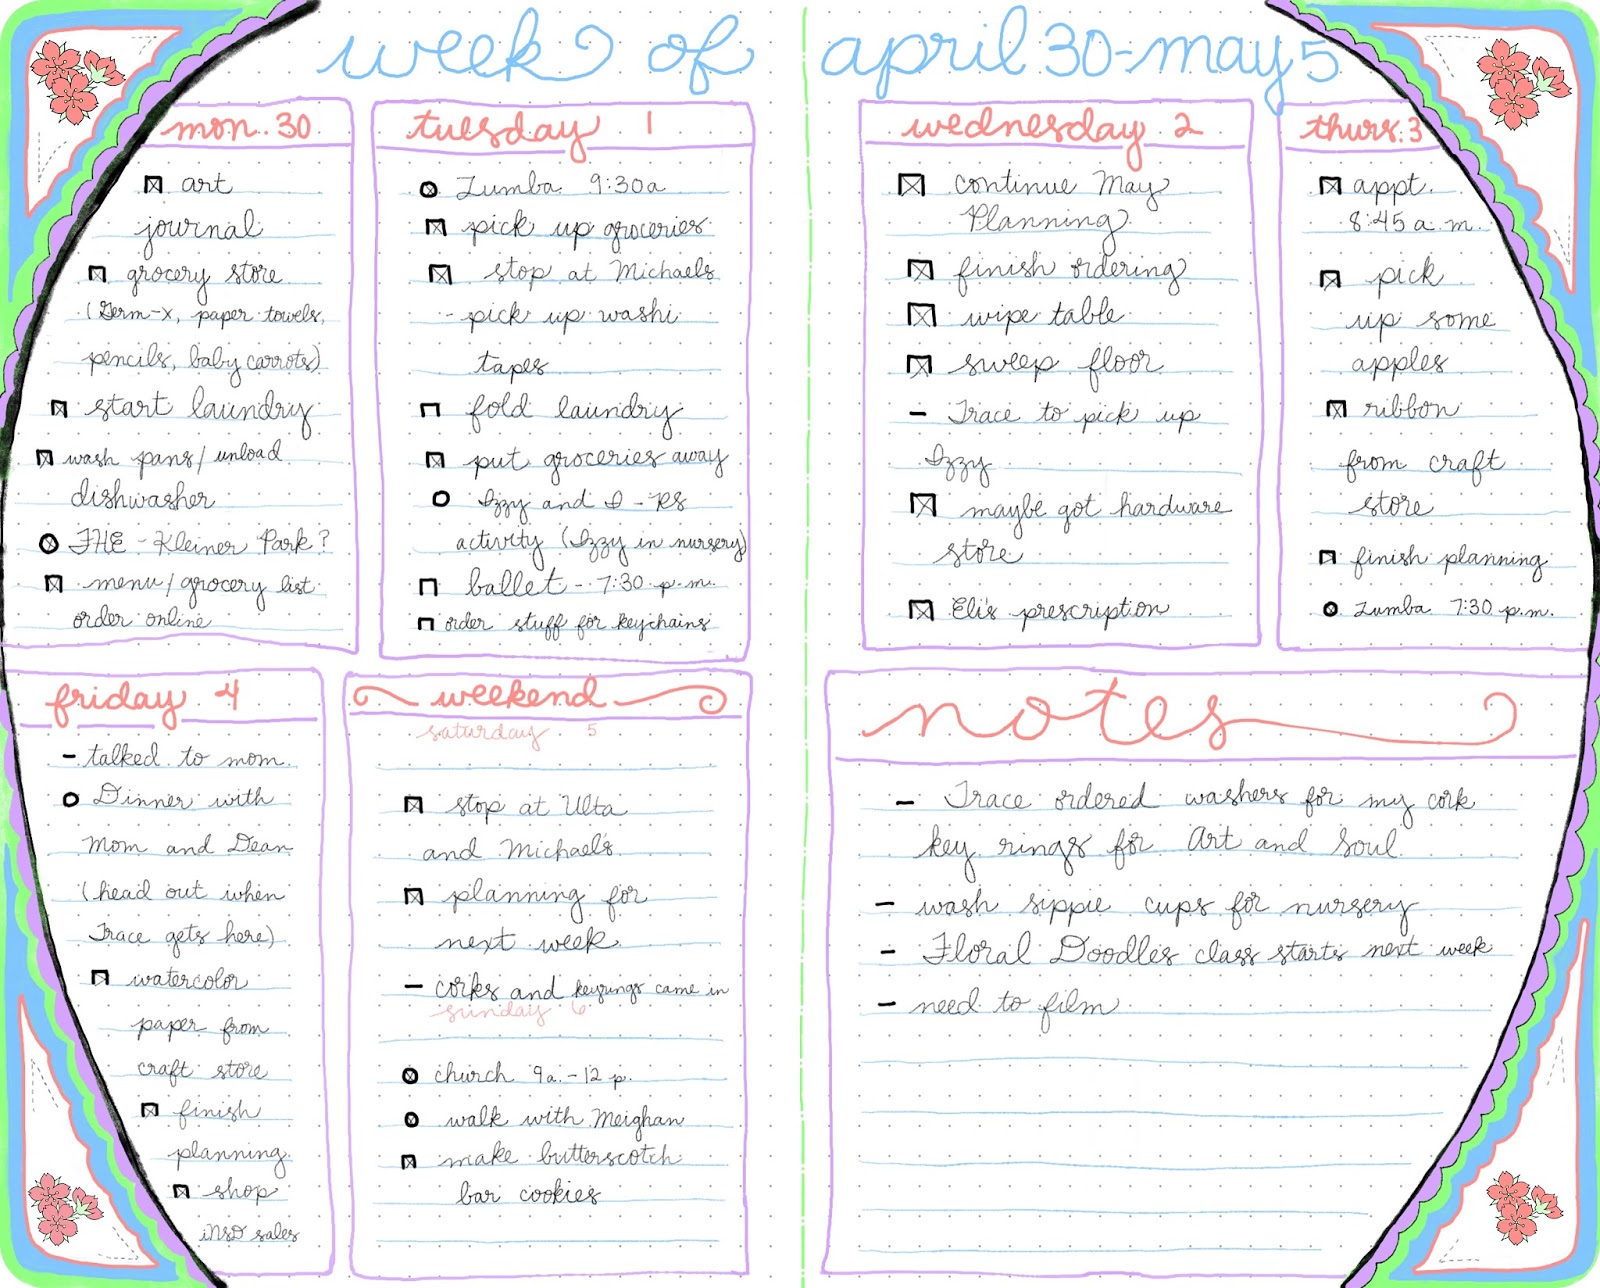
On the spread I made for last week, I really wanted to add in a circular shape of some sort, so this is what I tried out. It was a bit of struggle, since I've not figured out a great way to use a standard template that one might use on paper, and Morpholio doesn't have any circle shapes available to use in the app. In any event, I still had fun with it. The flower shapes are from the Boho Berry Tribe Resource Library. Kara, the blogger who offers those resources, has some great stuff that you can use in your digital journals. I highly recommend you check her out.
Here is this week's spread...which I tried a little experiment with. Part of it I really like, and part of it I feel like could be better. However, I also realize that not every spread needs to be an award winner, and that my BuJo is a perfect place to try things out and it's not a big deal if things don't work out the way I expected. It was a fun thing for me to use hexagons, and in the future I'll try again and improve on this. The colors are awesome and it was fun trying it out.
For my memories and calendar pages, I decided to limit each of them to one page. April was super busy and I spent time doing a lot of basic things to keep my household running, and had some deadlines to meet. It was much easier to just use one page each for these two items. The memories page is all my work, and I hand drew the calendar grid, lettering and numbers myself. The "May" word art and the two washi tape strips are also from the Boho Berry Resource library. It was so cool working those into my calendar page.
I'm including another packing list, since I'm heading to an art journaling retreat near the end of the month. Can you tell I'm loving my Bitmojis? There isn't a ton on this page right now, but I don't want to fill too much in until I get my list items written down. I'll give you another peek next month when the page is finished.
Ok, guys...that will do it for now. I hope to be back soon with another post. Thanks for being here and letting me share my words and creations with you. Have a nice day!
Hello ladies and gents and welcome to today's post!
I'm excited to bring you a review on the The Paperless Post. This is an online
company that allows you to create e-cards, either from their website or their mobile app.
***Disclaimer: This is a sponsored post. I wasn't paid a monetary sum, but instead was compensated with coins (i.e. store credit) to create some cards and blog about it. However, please note that I wasn't required to give only a positive review. I'm free to give my own thoughts about what I liked/disliked in regards to their website, app, and the products available therein. All opinions in this review are my own. I'm a blogger/YouTuber who only collaborates with companies who will allow me to share my honest feelings about their offerings.***
Now on to the fun stuff...
When I was first contacted about a review of the e-cards, invitations, and stationary available on the Paperless Post, I was a bit skeptical. To be honest, most e-cards I've seen are pretty cheesy and unimpressive. I've sent very few of them to friends and family because I'd rather create something in Photoshop and send it on. Once I browsed the site and saw the quality of the items there, I jumped at the chance to play with these e-cards.
I was pleasantly surprised to find beautiful, high quality card options at the Paperless Post. Well-known designers, such as Jonathan Adler, Kate Spade, Vera Wang, Oscar De La Renta (one of my personal favorites), and more have gorgeous cards and stationery available there:
Here are some of the Oscar De La Renta cards I plan on using in the near future. These are so elegant and have gorgeous detail:
There are times when I've wanted to send a premade e-card, especially when I've used up all my paper handmade cards, and need something really nice in a pinch. Or perhaps I want to send a note or invitation to a friend who lives in a different country, and don't have time to get down to the post office. Now that I've found the Paperless Post, their beautiful e-cards and invitations will fit the bill.
Getting Started
If you'd like to try your hand at making an e-card on Paperless Post, I'd suggest doing a few things to get going. I've included useful, clear visuals here, because I feel it's easier to also "show" rather than just "tell" you how this works. Please note that there are parts of some pictures I've blurred out to protect the privacy of myself and the others I sent e-cards to. Remember to click on any of the photo thumbnails below to get a larger, better look.
1 - create an account & buy some coins. To make e-cards on The Paperless Post, you must purchase some store credit, which is in the form of coins. Coins can range in value from about 14 -30 cents apiece. See the Coins And Pricing Page for more info and to view to coin package purchase options. I believe sending a card is approximately 30 cents or so, depending on the options you choose for customization. There are free cards and accessories (i.e. stamps, envelopes, envelope liners, etc.), but it's more fun if you have some coins to buy the other options that require a purchase.
2 - Browse through the various card types (invitations, birthday cards, thank you cards, photo cards, and more) and choose some favorite designs. As you look through the card selections available, you'll see a little heart under each one. Click the heart to add the card to your favorites. I find that the process of sending cards is much faster and easier if I'm looking through designs I know appeal to me.
3 - Populate a mailing list with email addresses of those you want to send your e-cards to. This site provides a handy address book for you to plop them into. Once you're ready to email your card, you'll be prompted to choose a recipient (or 5 or 10), and all you'll need to do is check the boxes next to their names. Paperless Post's address book will auto fill the appropriate fields, and sending them off will take only a few minutes. It's incredibly fast and easy.
After this, you're ready to get cracking and create some beautiful digital correspondence.
How To Choose And Customize A Card
While this website is an awesome place to create and send out invitations, I find myself drawn more the other types of cards, such as birthday, "just because," and holiday cards.
Today, I'm going to take you through the process of creating and sending a birthday card.
First, I chose my card for a male relative who's recently celebrated his birthday (cost for this card is 2 coins):
Next, I clicked on the card, which took me into "Customize" mode on the website. From here I get to modify the text and some other options, such as envelope, envelope liner, the postage stamp and the backdrop the card sits on. While the free accessory options were great, I chose to go with items that cost a few coins here and there. Most of the cards I sent out while I was learning my way around the site/app cost me around 3-6 coins. I felt it was worth it.
After selecting the card, I clicked the arrow on the right side of the screen to get to the next section, where I choose a backdrop for it. My card will sit on the backdrop, and there are many options here. The default background is a lovely white & gray marble background, which is a fine choice, or you can remove the background altogether if that's your preference. I chose the gray fabric one, since it makes the design on the card pop (cost for that was 1 coin):
The third section allowed me to personalize the sentiment. The text options screen allows you to choose from several fonts, and you're also allowed to recolor and resize as well.
After this, there are choices for the envelope and its liner. I decided to go with the suggested envelope (which is the brown one shown below) provided with the card. However, there are other colors and styles you can choose a different one if you desire. The next arrow after that allows you to select a liner. I went with a different liner than the one that was already in the envelope and choose a white liner with fun aqua stars (cost: 1 coin):
At this point, it's time to choose your postage stamp and a postmark. I paid a coin to use the cupcake stamp since it went along with the theme of the card. I stayed with the free postmark that was already in place. You'll notice that the text on the envelope doesn't yet have your recipient's name, but don't fret. This is taken care of when the cards are emailed out.
Emailing Your Card
This step is a seamless process and can be done quickly. You can choose to send it to one or as many recipients as you choose using your address book, or if needed, you can type in a single email address in the second section below (I'm not 100% sure, but I think it costs 1 coin to email each card).
Since this card costs 6 coins per recipient, I take this into account before sending it off. In other words, if I send off 3 cards, there will be a total of 18 coins deducted from my account. There will also be a chance to preview how the card will look when it's sent to your special person (see thumbnails below). Cards created here have a fun animation sequence where it pops the card out of the envelope and allows your recipient to read it:
get your card ready to send through email
How to preview your card
card animation & how it looks
sentiment on the back of the card
confirmation email sent
If you'd like to see how the card animation in action, please watch the companion video I put up on my YouTube channel (the animation is super cool):
One thing I really appreciate about sending these e-cards is you know if your card has been sent or not. Paperless Post sends a confirmation email informing you of the card's delivery, as well as some other nice options shown above. It's also handy that you're able to go back to your virtual "post box" and see who has read your cards, how many are unopened, and so on. The post box is found by clicking on your account name or email in the upper right corner:
Other Considerations
Aside from creating a card, there are a few other things I think would be helpful to anyone who stumbled onto Paperless Post for the first time.
Any greeting, birthday, Christmas, and most other types of cards that aren't previewed as invitations can be made into an invitation. You're able to track invitations or any cards you've sent here on your tracking page, which you can find by accessing your account dashboard. Below you can see that I have only one recipient for my birthday card, but if I'd chosen to make an invitation instead and send it out to ten recipients, I could track whether or not all of them had received their invites. I could further see if RSVPs had been replied to, export a list to email or other places, or print the list. Paperless Post really rocks this functionality!
Another incredibly awesome feature is the ability to include an auto-generated map to your invitation. Here's a invitation preview of a garden party invitation:
If I chose to send out invitations to a guest list I create for this event, I can type in the address of the location, house, venue, etc., and a map is included in the email along with the card:
One of the things I love the most about Paperless Post is the impeccable, high quality and beautiful aesthetic of these cards. Being a digital scrapbooker, I'm a real stickler for high resolution, good design, visual interest, and good color payoff on any digital items. I find that you get all of these things with these e-cards.
For instance, here's the envelope and liner for the garden party card I showed you above, as well as a card I sent to my hubby last week. Check out the luscious details I've pointed out. Very few, if any, other e-cards have this amount of detail, or the same fun accessories available to their end users:
Using the Paperless Post App
Currently, Paperless Post offers mobile apps for Apple Devices. Android users and those on other platforms will have to use the website versions on their desktop or laptop computers. For those of us on iPhones and iPads, you can download apps for them here.
You can see how the apps look on your phone and tablet (images from the Paperless Post website):
After using the desktop version and these mobile apps, I came away with these thoughts.
First, I felt like the best experience happened on my laptop. It's just easier to see the various customization options on the big screen, as you can tell from the photos included here. I had to play with the app for awhile before I figured out how to change out accessories, but finally found out how to get it to work. After opening the app, I chose this path: create>thank you cards (or any other type you want) & design for online.
You can see in this first screen cap the white/gold confetti backdrop, which I thought competed too much with the design on the card. After some looking around, I finally saw the paint roller icon at the bottom right of the screen, which is the backdrop icon.
From there, I got a small pop up at the bottom of the screen showing the backgrounds.
I chose a purple backdrop from the pop up, then hit done and was taken to a new screen with the envelope options. When I clicked the the envelope icon on the lower left side, I was given a similar pop up with choices for different liners, however, I haven't yet found a way to change the envelope style or color on the app.
The iPad app works very similarly, however, I don't have photos for you because the app acted sluggish or froze up on me. I had to close the app and start over, and got so frustrated because I came up with no visual examples for you. I had better luck going to the website on my iPad, and could view and make cards much the same way as I did with my laptop. I would suggest doing that until some updates are done for the iPad app.
The one really big advantage about using your phone, aside from creating cards on the run, would be ease using the tracking functionality when you are out and about and away from your computer.
I personally think it would be nice to have to app keeping track and sending me notifications. If I was at the store buying party supplies for an event, it would be super cool to find out 2 more people RSVP'ed, so I could pick up a few more things there and then.
Also, another perk of the using the iPhone app is the envelope view. On both the computer and iPad versions, only a portion of the envelope is showing, whereas on the phone, the envelope gets it's own screen view. I love being able to see the whole thing and how cool it looks.
view on the phone (scroll with arrow between envelope & card)
website view on computer or iPad
Wrap Up And Final Thoughts
The Pros:
-quick, easy card creation
-Wide selection of versatile & beautiful card designs
-Well known and respected designers have cards designs here
-website is user friendly and easy to navigate
-easy and convenient to send out invitations and track RSVP replies
-high quality resolution on all site offerings
-good value for your money
The Cons:
-only a few free designs for cards and accessories
-some may not want to pay to send e-cards.
-No way I can find to choose a different envelop on the mobile app
-iPad app is sometimes unresponsive
-envelope not as visible if viewed online
My verdict? While there are some things I'd like to change, I still really like and enjoy using Paperless Post e-cards. I feel like customers get a good product or an inexpensive fee, the prices are comparable to other e-card services, and the Paperless Post has nice offerings that other similar websites just don't offer.
I would highly recommend Paperless Post and hope you will check them out. You can find them at www.paperlesspost.com. Should you choose to open an account with them, I believe you are gifted with 20 free coins to get started. I hope you enjoyed this post, and let me know if decide to make some e-cards with Paperless Post. I'd love to know how it went or hear your thoughts on e-cards.
Hello everyone, and I hope all of you who celebrate Easter had a blessed and joyous holiday! I'm back with this month's entries in my digital bullet journal. If you guys are interested, here's this month's video:
Also, I like to include a closer look at each page spread here on the blog if you guys wanna see them in more detail than you can see on the video. As always, click on any picture you want a larger view of.
I'm starting with a packing list layout I made last month before my hubby and I celebrated our anniversary:
Over the last year, I've found that writing my packing lists in my BuJo works better than other methods I've tried. I remember more of the things I want to bring, and forget items I want to bring less. My hubby and I took a few days away without the kids to celebrate this milestone. I think this one is the best to date because I used a few more categories than I have in the past and it was easier to get things packed as I went. Plus, I decided to try drawing some make up and skin care doodles, which I was unsure about, but I think they turned out great!
Before I started into April's entries, I documented the craziness of March:
I didn't feel quite satisfied with this one...with one of the kids had surgery twice and between taking care of her, the rest of the kids being out for spring break, and celebrating my anniversary, there wasn't much spare time to work in my BuJo or create drawings. This page is more word art than anything, but that was my month! March went quickly and I felt a bit overwhelmed, so I guess you can see how real life creeps into a bullet journal.
I tried a new design for this month's calendar:
Even though it takes a bit longer, I enjoy creating a calendar that spreads across two pages. I like the restfulness of the negative space between the boxes and how easily the eye goes across the page. The wavy lines are awesome, and I also love the look of the dashed outlines (the second picture is zoomed in so you can see how fun the detail is).
Because so much was going on, I didn't get a page spread for the first week of April, so I decided to just skip to the following week and get that one done. I opted to keep it simple...it was important to get the spread done and ready to use rather than trying to come up with a fancy layout.
One thing I did do that was fun was to add my Bitmoji avatar to the notes section of this spread.
This is not my original idea --- I watched a video by Kara, from Boho Berry about creating and using digital stickers in your digital BuJo. You can watch her video to learn how to do this.
Since I'm not using the same app as her, I simply chose to to into the Bitmoji app, copy some of my Bitmojis into a folder in my camera roll, then bring them into Morpholio Journal as I do other types of photos. Resizing and placing them into my digital BuJo is tricky sometimes, but I still thought it was super fun! Now that I have some of them saved as stickers, I'm going to build a few spreads around them in the next few weeks!
If you are unfamiliar with Bitmoji, I suggest you download the app on a mobile device, create your Bitmoji avatar, and then have fun using them in your journal. It feels like an awesome personal touch!
Well, folks, that's it for this time! I hope you enjoyed seeing what I've journaled so far this month, and if you feel so inclined, leave me a comment letting me know what you are excited about recording in your BuJo.