Showing posts with label tutorial. Show all posts

Last Minute Graduation Cards


Well, as you can guess from the title of this post, I needed some cards for a couple of graduates, realized that my stock of pre-made cards were gone, and so I scrambled to get some done before we had to give them out.

The nice thing about these cards is that you can customize the color (in most cases) to match the color of your graduate's school or university.  I used the Leaving the Nest: Graduation kit by Traci Reed.  Click here to get the kit:


As for the physical supplies used in the cards, the links are below.  If I don't have a link for the actual product or a substitution, I'll also make a note of that: 


double loop picot trim (this is a close substitution)
Brown Gingham Ribbon (a substitution)
Rusty Hinge Distress Ink (used in the video, but not pictured)
Glue Dots Dispenser  (not shown in the picture, but used in the video)
Also, use the adhesive of your choice if you want something else in addition to the Glue Dots

Here's the video showing how to make the cards: 


Let me know if you make cards based off of the ones in my video, and feel free to comment with future post or video ideas, suggestions, or constructive feedback.  Thanks again for spending part of your day here.  Have a good one!


Simple and Elegant Gift Tags


When I get really busy during the holidays, I find that the best thing to do is to stop what I'm doing, and make a little time to craft something.  I've also learned that if I focus on a smaller project rather than a big one, I feel more relaxed and more satisfied with what I've made when the project is finished.  It's one little way that I slow myself down and enjoy this time of year, which is great for letting go of that holiday stress. 

My latest YouTube video shows you how fun and easy these little tags are.  I hope you'll give it a watch: 


Here's a list of the supplies I used to make these cute little goodies.  And just a little disclaimer:  If I cannot find a link to the supplies below, or they are discontinued, I will link you up to other projects that are similar and would work just fine in their place. 

And, as always:  if you prefer to use items from your stash, do it!  I'm a big proponent of using what we already have.  


Traditional Supplies: 


American Crafts Red Ribbon (this is a close substitution)
Clear Scraps Shapes & Albums (not all the shapes I used are there, but some of them are)
Clear Scraps At Scrapbook dot com (they have some shaker and chipboard shapes that could be used for this, too)
Baker's Twine (This is a pretty good deal for all of these spools)
A standard sized hole punch  (found at most office supply stores)
Scissors
A black gel or writer pen, if you want to write on "to" and "from" (not pictured)

I have some blue ribbon, some photo squares, and some adhesive pearls in the picture, but they ended up not making it into this project, FYI.


Here's another picture of the tags, as well as a couple of gifts I attached them to: 


I hope you like these tags, and will make some of your own, even if it is just for your own enjoyment!

Thanks for taking time from your day to take a look...:)


Using the iPad Pro + Apple Pencil as a Pen Tablet for Digital Scrapbookers


My husband recently gifted me with a new 9.7 in. iPad Pro and an Apple Pencil to go with it.  At first, I wasn't sure what the heck I'd do with the pencil...I didn't know if I'd do more with it than use it to click around with as I navigated between apps on my iPad.

One night, he and I were talking about my old Wacom Bamboo Tablet, and I was wondering if I could still find drivers for it, since it's getting to be an older device now.  We started talking about the idea of me using my iPad Pro and Apple Pencil as a pen tablet...I just needed an app to enable that functionality.

He had used an app called Duet at work, and thought it would be a good one for me to try, so I gave it a go.  It worked pretty well, as you can see from the the video demo I linked for you above.  I'm also kind of intrigued by Astropad, which I'm trying to decide if I want to buy or not, so that may be an option for some of you if you choose not go with Duet.

It took me a little longer this time to get this video ready, because I had a bit of trouble with the Apple Pencil, as it was giving me serious writer's cramp.  I also wasn't sure which angle to set my iPad at to be used most comfortably.

In the end, I decided to lay the iPad down flat, and used a couple of accessories with the iPad to help make the experience more comfortable, and now using it is a snap.  Granted, this set up only works with Apple Devices as far as I know, but if you have these goodies on hand anyway, you are all set and have a pen tablet at the ready the next time you want to scrap with one!


Let me know what you think of the video, and if you think you'll try using your iPad Pro as a pen tablet...I'd love to get your input on how the experience went for you.

Aside from my MacBook, iPad and Apple Pencil, here is a list of the supplies I used in my video:

Mudder Tablet Drawing Artist Glove

Ztylus Apple Pencil Case

Summer Mini Template:  unfortunately, it's discontinued.  But, here is a link to Julie Fei-Fan Balzer's stencil page on Scrapbooking.com  There are a few face stencils on this page your could easily use instead: Julie's templates at Scrapbook.com

Procreate App

Beep Beep Digital kit by Jen Allyson: Discontinued.  Here is another very similar Digital kit on the same theme by Kim Jensen at the Lilypad: City Streets Elements kit  
and City Streets Papers

I think that is everything --- so if any of you have questions, comments or constructive feedback, feel free to holler!  I know I've probably forgotten some things I wanted to include in the video, so ask away if you have further questions.

Thanks for stopping by today!

Using Photoshop Brushes on a Layout


You guys wanna see how easy and fun it is to use brushes on a digital scrapbook page?  If so, then I have a helpful video for you on how to do just that.  It's a follow up of my previous one, where I demonstrated how to either load or install brushes.

To create this page, I used Mye De Leon's Fleeting kit, which is so fun and pretty:


http://www.snapclicksupply.com/fleeting-complete-kit


I also used this add on brush kit of hers to demo using brushes to create part of a title:


http://www.snapclicksupply.com/fleeting-stamps

And, last but not least, I also incorporated some of these fun tapes from this coordinating add on kit:


All three of these great kits can be found at the Snap Click Supply Online Store, if you are interested in picking up these kits or any others. 

Here's the video, if you like it and wouldn't mind, then give it a thumbs up on YouTube and subscribe to my channel.  I would love to have you as followers: 


Also, as a thank you for watching my video and visiting my blog, I have a free template download for you.  I recreated the bones of my layout into templates --- there's one in 8.5 x 11 and another in the 12 x 12 size. 


Thanks again, for taking time to be here.  Have a wonderful day!!

Do It Yourself Family Photo Shoot


I love this time of year for several reasons. One of those reasons is receiving the photos and Christmas/Holiday greetings from my friends and family. I really like to respond in kind by creating a photo card with a picture of our little brood. Above is the one I did up last year using a card template by Holly Brook Jones over at Two Peas.

The difficult part comes when we go to take our family picture. The first year we had the kids, we did the smart thing and had a photographer take photos.

Honestly, though, the last couple of years have been very challenging, and booking a sitting with a photographer didn't happen. Time, money, and sheer exhaustion got in the way, so we chose to do it ourselves.

I don't think this way is the most optimal. I would always recommend having someone else take your pictures, but this can work in a pinch. And sometimes, around the holidays, we may need a quick, no-fuss method for getting things done.

Here are some tips that worked for us in our makeshift photo shoot:

1. Choose coordinating outfits for family members.
We always choose colors that go together well instead of trying to have everyone wear something that's identical. Last year, as you can see from the card above, everyone wore jean jackets with white tees underneath. The other two years, I've gone down to Old Navy and got everyone cute holiday shirts that had similar colors.

2. Do a practice run with some of the poses.
This worked especially well for us since we have young kids. Here is a picture of my hubby showing our youngest boy how he wanted him to pose:


3. Decide where you will take the pictures.
We have taken ours in or around our house because we are generally pressed for time. Outdoor photos are my preference, but this year, the weather didn't cooperate on the day we planned to take them. Instead, we used the place in our house with the best light. We chose our staircase because of the light, it kept the kids fairly contained and they couldn't get too rowdy. The previous year, we took them outside on our patio.

4. Use a tripod.
This idea is probably an obvious one, but it bears repeating.


My hubby set ours up and tweaked the camera settings so that it would take pictures automatically on continual burst (where the camera takes several pictures in a row until you tell it not to). This allowed him to hit the button on the camera, then run over really fast and jump in with the rest of us.

5. Take a lot of pictures!
If you have squirmy kids or family members that have trouble keeping eyes opened, tongues in mouths, and so on, a lot of pictures to choose from will save your bacon. Using digital cameras makes it easy to decide what pictures to keep or delete. It's perfectly OK to delete the ones you don't like or need.

And let me be perfectly honest here --- there were many, many shots that looked like this or some variation of it:


It makes me laugh now to look at it now, but at the time I was pretty frustrated. As we looked through the hot mess of crazy pictures, we did find some in the set that were good. Here is the one we chose for our holiday card:


6. Use photo editing software to hide any flaws in your picture.
My husband and I laugh when we see this picture, because our oldest son (in the light blue shirt) is leaning forward slightly. Trace says Elijah is doing his "on the potty" stance in this picture. If we had someone else take the picture, then they could've told Elijah to sit up straight, but that's how it goes. We did the best with the time we had. So instead, I will use Photoshop Elements and some cute digital goodies to hide our picture taking sins. I found a fun holiday card template made by Michelle Coleman to plop the photo into.

With a little photo editing magic and Michelle's template, here is the finished card:


The cute white paper strips, the red patterned paper on the left, and tinting the photo to a sephia tone all make the things that bugged me about this photo less noticeable (of course, now all of you will see my son doing that goofy sitting stance forever more). I'm actually quite happy with how this turned out, even if this wasn't our first choice for taking the photos. My husband and I agreed that even though our youngest has a cheesy grin, it's pretty cute and shows his personality at his age.

7. Once the group family pictures are done, take some of individual family members.
While you still have everyone there and dressed nice, take advantage of it and get some good shots of them. This is one of my favorite things about family picture taking time, because the kids really like the one on one picture taking. And, Trace and I also snapped pictures of each other, since we are always behind the camera. Here are some of my favorite individual photos:


I hope you find these ideas helpful. I don't claim to be an expert on the subject of photography or family pictures, but I do know how to make things works when I'm short on time and energy. :)

Enjoy taking your holiday pictures and enjoy the best of the season.

My Review: Picasa as a Digital Organization Tool

One of the most daunting tasks in scrapbooking is getting all the cool stuff organized. Ideally, we want to find what we need quickly and easily. I don't think I know any scrappers who love an exhaustive search through their supplies; that can take longer than the actually making the pages.

I've really enjoyed digital scrapbooking because it doesn't take up physical space or make a mess. However, as I have gone along, I've learned that finding those cute embellishments and papers on my computer can be a real drag if the supplies aren't organized well.

Even though I have a folder of digital kits on my computer, and the kits in sub-folders inside that, looking for something was still a bit of a wild goose chase. As a newbie digi-scrapper, I'd right click on the "start" menu, choose "explore," and go from there. Most of the time, an initial look at the thumbnails of my supplies was difficult. I knew this was definitely not what I wanted to do long term.

My thoughtful and computer savvy husband saw me struggling with all of this. He knew I needed a way to get my digi supplies organized, so he went nosing around the web. He found the Picasa website, downloaded the program for me, and showed me a few basics.

Picasa is primarily designed to organize photos and has a few photo editing capabilities on it. While I am doing a little organizing with my pictures in Picasa, my focus right now is on my digital kits. When you know how to use it, the program is wonderful for organizing all the digi goodies.

While I consider myself fairly competent on the computer, I didn't find using Picasa to be intuitive. Lucky for me, I found that Molly Schneider over at Jessica Sprague's site offers a class that teaches how to use the program. Molly's class has demystified Picasa, and now that I actually know what I'm doing, I've liked using it quite a bit.

Once you have configured the settings on Picasa so that it can "see" all of your digital files, then you are able to view all the supplies you have on your hard drive. You will even find some you didn't know were there or that might have been misplaced:
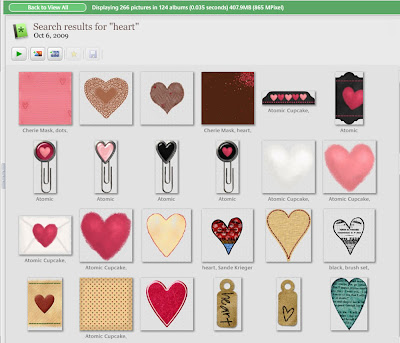


In the above example, you can see that I searched for the term "heart." This is a portion of the items that Picasa found for me --- both the items I tagged and the ones that have that term as a file name. Before using Picasa, I forgot I had some of the items, and wasn't using them because they were hard to locate.

One of the best features of the program is the ability to add tags. For those of you who are not familiar with that term, a "tag" is basically a descriptive caption that you apply to photo, digital element, etc. The idea behind tagging is when you add them to the items you wish to organize, it allows Picasa to find them again quickly and efficiently. So when you put a term, such as "brown" into Picasa's search engine, it locates the things with that file name, and anything you've tagged with that word. See below to view some digital elements that have been given tags:


Even though it's small, you can see the item I've circled has the tags of "beach," and "brown." It would be similar with any other tags that are applied to a photo or digital element. It reduces time spent searching significantly.

To tag a photo in Picasa, it simply requires a "Control T" once Picasa is open. Many times, the tagging window will already be open (provided you are running the latest version, which at this time is version 3.5).
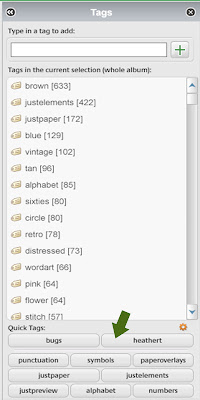


In the above picture, take a look at the top portion of the window. You can see a space to enter the tag you want. At the bottom, there is a section of "quick tag" buttons (see where I've placed the arrow). Quick tags buttons are places you can add the tags you most commonly use. When you tell Picasa what you tags want to apply to these quick tag buttons, you no longer need to type in your favorite ones. You can just click the buttons instead. The top two buttons will show the last two tags you applied to items in the Picasa database.

So, what do I think of Picasa so far? Here's my list of pros and cons.

Pros:
1 - Picasa is free and won't cost you a cent.

2 - The program can be used on either a PC or a Mac.

3 - Tagging definitely rocks. I can scrap so much faster when I'm looking for a specific element, paper, or color. Searching is a piece of cake now.

4 - It's nice having the tagging window open along side the view of the items I have showing. It makes searching and tagging really easy.

5 - Picasa allows you to mark certain photos with stars so you can find them later. You can also force the program to search for photos by looking for faces. If you click on the link I provided above for Picasa, it will explain how version 3.5 can be set up to apply name tags to photos as they are being downloaded from your camera.

6 - If you use Blogger, it has a feature which allows you to quickly and easily upload pictures from Picasa to your blog. I believe there is similar functionality if you want to upload to Facebook.

7 - There are other cool features that Picasa has to offer. I'm still learning what they are and how to use them. Honestly, there are too many to cover here. I'm excited to learn them and discover how they will speed up my photo and kit organization.

Cons:
1 - Sometimes when I'm applying a tag to an item, I might misspell it. Let's say I'm trying to type the name of the color "brown," but instead I accidentally put it in as "borwn." Unfortunately, my typo stays in the saved list of tags. I can delete it off of an item if the tag is wrong, but it still comes up if I incorrectly type it again. I find that a little annoying.

2 - Since Picasa is part of Google, the main place to get help is over at the Picasa message boards. That is OK for a short reference, but I find it difficult to
get help from Goggle staff. Maybe that's just because I don't know my way around yet. Thankfully, I haven't had any issues where I needed much help with the program.

3 - Tagging can take a long time if you didn't organize them as you go, but it isn't impossible. It can be done while you are watching TV, or even if you have just 15 minutes somewhere.

My overall verdict? Even with its drawbacks (which I still think are quite minimal), I think Picasa is a great program for organization. I have been happy with it by and large, and highly recommend it. Since the program is free, it would be easy to try out. And, if it turned out that Picasa isn't someone's cup of tea, they could move on to another program.

I've found the program to be a helpful tool and wanted to pass on what I've learned so far.

Thanks again for visiting...:)