Showing posts with label digital kits. Show all posts

How to Make Custom (and unique) Clipping masks


Have you used the shape tool in Photoshop Elements for a clipping mask lately?  And if you have, did you simply use a square or rectangle?  Well, then, try mixing it up a little and using basic shapes to create a composite shape.  You can come up with some fun figures to clip your pictures into. 


In the page I posted above about the Oregon Coast Aquarium, the comma or swirly shapes along the right side were created using the custom shape tool, with the half circle shape within in that.  You can watch the video below to see how I did it: 


Here's the kit I used to make my page: 


Here are the other pages I made that unique clipping masks: 


The page below has the half circle shape combined with a vertical rectangle.  Another fun effect for this page is that I used the text tool to create text on a rounded path, snugged it up closely to the photo mask, and merged (or combined it with the custom mask I just created.  So now, not only did I combine the two shapes together, the text adds another fun look to this clipping mask.  For a little more visual interest, I created an outline stroke that I offset from the clipping mask.  I love the way it turned out!  I can't link you to this kit, as it is no longer for sale, but it is the Snap Click Repeat kit by Celeste Knight.


The next page I made used these shapes: 


This was the first page I made using composite shape clipping mask.  I was extra proud of it because it made the Two Peas digital newsletter when that site was still up.  You can see from the example above I used a horizontal rectangle this time, then two quarter circle shapes.  I used the skew command (Image > Transform > Skew) to more or less make the rectangle a parallelogram, then skewed the half circles as well.  I rotated the quarter circles in opposite directions, then plopped them on the ends of the parallelogram, then merged the layers.  In the layout below, after I was finished making the shapes and duplicated them to create two other copies of the shape for my photo clipping masks.  I also made the shapes a little taller and not as wide so they'd be a more ideal size for my photos.   I also put an outline stroke around the clipping mask to make the shapes really pop from the page.   This kit I used here is by Jen Martakis.  It's another older one and has been discontinued.


So tell me...have you tried making clipping masks using this technique?  Or is it something you'd like to try?  Let me know if you get the chance. 

Thanks again for reading my post and I hope you'll check out the video.  Enjoy your day!


DIY Simple Digital Embellishments


Would you look at this layout and think that everything on the page (excluding the fonts and pictures) came from the kit I'm going to show you below?


Well, it's true!  Using only The Watercolor Summer kit by Kim Jensen and some tools in Photoshop Elements, I made the Easter layout at the top of this post.  

My latest video shows you how you can take a small kit, and make some embellishments to go with it.  There are times when a kit doesn't have what we need, and we can improvise enough to make a great scrapbook page. 


I'm not saying by any means that this is how pro digital designers make their products...they use different programs and have spent a lot of time honing their skill.  All I'm saying here is that this is a great way to spruce up a page in a pinch, or create a custom embellishment or two when you want it. 

FYI, the only supplies I used other than Kim's beautiful kit were some fonts --- Phosphate Solid, KG Sorry Not Sorry Chub Regular, and my own handwriting are the ones you see on the layout. 

 I'm curious...have you ever made your own digital embellishments?  Why or why not?  I'd love to hear from you!

Alrighty, guys!  Have a beautiful day!


Beginner Handlettering on a Layout


If you've looked around the web lately, it seems like there has been an explosion of hand lettered items...fonts, invitations that have been hand lettered, instructional books on how to do it, and more.

And, if you have been on Pinterest in the last 6 months, bullet journaling, and hand lettering in those journals is all over it.  I have been dying to try lettering since then, and decided to just plow ahead and give it a shot.

Obviously, I am just starting out as a beginner, and I in no way stating that I have this skill down or that I'm an expert in any way, shape or form.  I am willing to learn, and decided to take you along as I made my first scrapbook page with a handwritten element on it (the word "snow" on the layout above).

Even though my hand is shaky, and I know it will take a lot more practice, I'm really enjoying this process.  And I know that as I go along, I'll get better hopefully can share what I learn.

Here's the video I created showing how I made my hand lettering.  Please note that I used my Apple Pencil, iPad Pro, and the Procreate app to use do this word art.  I then imported it as a .psd file from Procreate and sent it to myself in an email.


Digital Kit used:  Arctic Exploration Kit by Katie Pertiet at Designer Digitals:


 Here's a list of awesome hand lettering blogs you should check out:

Hello Brio
Random Olive
The Postman's Knock  (focuses a bit more on calligraphy, but there are some brush lettering resources as well)
Dawn Nicole Blog

I hope you guys find this helpful...and if you feel so inclined, would you let me know if you are a hand letterer?  Have you ever tried it?  Let me know!

Talk to you all later,


It's Almost Time for Holiday Themed Albums Again...

...are you excited abut this prospect?  Or overwhelmed by it?  I'm excited about it, and can't wait to jump in again.  I chose not to do Journal Your Christmas or any holiday themed album last year, simply because I was going through some stuff and was just emotionally exhausted.  So whether or not you are joining in with the crowds doing themed holiday albums this year, I feel you either way.  I hope however you choose to celebrate this season, you'll find a method that brings you a measure of peace and happiness.

Since I am doing an album this year, I decided to go hunting for a Christmas kit that would work well for Journal Your Christmas, which means I want more than just the standard papers and embellishments --- I also want to find a number set for each day of the holiday season, unique color combinations, some awesome templates to keep the process simple but still fun, and I want a decent mix of solid and patterned papers.  I made a video about the best kits I found that meet this criteria.  I hope you'll watch if you have the time:


Also, I decided that it would be easier to put the links for all the kits I featured (and some others that didn't make it into my video, but are still worth checking out) here on the blog.  I hope this helps you as you do your shopping for digital goodies.  I haven't started my foundation pages yet, which is unusual for me, but that's OK.  I will just jump in tonight or tomorrow with some new digital goodies. Here are the links to the stores/kits I think are best suited to this type of project.  Happy shopping!

From the LilyPad Digital Scrapbooking Store:

DYD 2015 6x8 Mega Template Album kit by Just Jaimee


Holly Days Kits by Amy Wolf


Other LilyPad kits to consider:

(has the look of stitched 6 x 8 sheet protectors --- so cool!)


Kits at the Digital Press:


Once Upon a Christmas: Collection by Anita Designs & Wishing Well Designs


Honorable Mentions:


(8.5 x 11 templates; could be modified to fit the current year)


Kits at Sweet Shoppe Designs: 


Other great kits at Sweet Shoppe: 
(while not technically a holiday themed template kit, it would lend itself easily to a December Album.  There are 15 - 6 x 8 templates for about $5 --- that's a great deal!)
From Digital Scrapbook Ingredients:
(Neither of these are full kits, but might work well with kits you already have)

Kits featuring other December Holidays: 


I'm so glad you stopped by today, and here's wishing that we all have an joyous holiday season! 


Video: Set of Four EASY Halloween Cards

Halloween is almost here, and I wanted to make a fun hybrid project in honor of the day.  Rather than focusing on treat bags or decorations, I prefer to make cards!!


I personally think that Halloween cards should be as popular as Christmas or Birthday cards...there's so many cool and silly ways you can use the theme of Halloween to create an adorable card to send to a friend.  

To make my cards, I used two kits from a collaboration done by Sahlin Studio and Britt-ish Designs who both create designs for the Lilypad: 


I divided this tutorial up into 2 videos, since I thought watching one very long one might get tiring.

 Here is part one: 


Also, here are the other digital supplies I used (or close substitutes) on these cards if you are curious or want to pick them up yourself:

Bebas Neue Font

Digital Distressing kit by Nancie Rowe Janitz

The Part Two video:


 Traditional scrapbooking supplies used (all are clickable links):

Hero Arts Yellow Gemstones
Recollections Adhesive Rhinestones - Black
The Paper Studio Le Petites Mini Paper Bows
3/8 in. Orange Gingham Ribbon
Queen & Co. Rhinestones in Snowflake
American Crafts White Cardstock
Aleene's Original Tacky Glue
Mini Jute String
Gelly Roll Pens in Black and Purple
Mini Glue Dots
Ranger Distress Ink in Seedless Preserves
Ranger Archival Ink in Black
Epson Matte Presentation Paper


Here is a close up look at the finished cards if you want to get a closer look:


Have a splendid day!!

Five Great Reasons To Try Digital Scrapbooking

I made a video in response to questions I've had from other scrapbookers over the years about why I switched to digital scrapping, and thought I would share why I love and enjoy it so much:


If you aren't one for leaving comments on YouTube, feel free to comment here about what your thoughts are about digital scrapbooking...I'd love to hear any constructive comments.

Here are photos of the pages I featured in my video, if you'd like to get a better look at them:


Also, if you need the link to the Adobe PSE free trial, here it is: Free trial for PSE15

Thanks & have a great day,


Using Photoshop Brushes on a Layout


You guys wanna see how easy and fun it is to use brushes on a digital scrapbook page?  If so, then I have a helpful video for you on how to do just that.  It's a follow up of my previous one, where I demonstrated how to either load or install brushes.

To create this page, I used Mye De Leon's Fleeting kit, which is so fun and pretty:


http://www.snapclicksupply.com/fleeting-complete-kit


I also used this add on brush kit of hers to demo using brushes to create part of a title:


http://www.snapclicksupply.com/fleeting-stamps

And, last but not least, I also incorporated some of these fun tapes from this coordinating add on kit:


All three of these great kits can be found at the Snap Click Supply Online Store, if you are interested in picking up these kits or any others. 

Here's the video, if you like it and wouldn't mind, then give it a thumbs up on YouTube and subscribe to my channel.  I would love to have you as followers: 


Also, as a thank you for watching my video and visiting my blog, I have a free template download for you.  I recreated the bones of my layout into templates --- there's one in 8.5 x 11 and another in the 12 x 12 size. 


Thanks again, for taking time to be here.  Have a wonderful day!!

I'm Alive...

...and finally healthy! My hubby and I both got ill, so between that, all the Halloween festivities, and my husband's birthday, I had a lot going on. I'm back in business now and thought it was about time I did a page share:

Here are two pages I did last month for Heather T with her digital goodies she has available at Pixel Canvas.

This first one uses her "Masked 1" and "Country Dream" kits:


This second page was done primarily to showcase her "Paper Pieces 1: Houses" kit. I also grabbed some patterned paper from her "Burnished Papers" kit:


The next two pages are ones that I did when I participated in the Fall Crop at Two Peas (it was held at the beginning of October). Both of these were created for challenges I took part in, and the layout of Izzy and the dragonfly got me entered into a drawing, which I was lucky enough to win! I got a hefty box of uber-cool scrapping goodies for my efforts...woo hoo!


The following three layouts are ones I created as I took part in some of the Digital Weekly Challenges at 2Ps. I don't always have time to participate in these, but when I do, I feel like they help me grow as a scrapbooker. I enjoy the fact that I can hone my skills by the simple act of doing a page for a challenge.


This layout was a real catharsis for me. While the crux of the challenge for this page was to use a black and white color scheme with a color photo, it was great to actually address something through this page that has been bugging me for a long time. And ya'll know how much I like to be honest in my scrapping:


For this next layout, we were challenged to create a shadow for an object on our page, then warp it so that it actually looked like there was light somewhere casting a real shadow. I made a little shadow for my pumpkin and was quite happy with it:


The next challenge I did required creating a digital paper tear somewhere on my page. Can I just tell you how much I've always loved paper tearing? It's not really the "it" technique anymore, but I still try to sneak it into my pages here and there. I could've just grabbed one of the premade paper tears I already have in my stash, but I really wanted to try making my own. It took a bit of experimenting to find the right type of brush to use, but I finally got it right. I added a texture filter and burned the edges a bit, and I thought it turned out pretty darned good for my first ever shot at it:


Over at the 2Ps digi-board, some of the other gals and I finished another round of the digi-morph challenge, where we are sent a layout by another person in the rotation, and we scraplift the page to create our own. Throughout the process, we see only the page right before ours, and none others. When we all finish, then the challenge hosts reveal all the pages so we can see how the layouts have evolved. Here was my page for that challenge:


If you are interested in seeing the change from the first layout to the last, check out them here.

Now that I've reached the end of my post, I suppose you know what's coming! Here is October's Twelve of Twelve" page. Shhh...don't tell anyone I actually took the photos on the 13th, since the 12th was kind of an icky day...:D


Have a super day!

My Review: Picasa as a Digital Organization Tool

One of the most daunting tasks in scrapbooking is getting all the cool stuff organized. Ideally, we want to find what we need quickly and easily. I don't think I know any scrappers who love an exhaustive search through their supplies; that can take longer than the actually making the pages.

I've really enjoyed digital scrapbooking because it doesn't take up physical space or make a mess. However, as I have gone along, I've learned that finding those cute embellishments and papers on my computer can be a real drag if the supplies aren't organized well.

Even though I have a folder of digital kits on my computer, and the kits in sub-folders inside that, looking for something was still a bit of a wild goose chase. As a newbie digi-scrapper, I'd right click on the "start" menu, choose "explore," and go from there. Most of the time, an initial look at the thumbnails of my supplies was difficult. I knew this was definitely not what I wanted to do long term.

My thoughtful and computer savvy husband saw me struggling with all of this. He knew I needed a way to get my digi supplies organized, so he went nosing around the web. He found the Picasa website, downloaded the program for me, and showed me a few basics.

Picasa is primarily designed to organize photos and has a few photo editing capabilities on it. While I am doing a little organizing with my pictures in Picasa, my focus right now is on my digital kits. When you know how to use it, the program is wonderful for organizing all the digi goodies.

While I consider myself fairly competent on the computer, I didn't find using Picasa to be intuitive. Lucky for me, I found that Molly Schneider over at Jessica Sprague's site offers a class that teaches how to use the program. Molly's class has demystified Picasa, and now that I actually know what I'm doing, I've liked using it quite a bit.

Once you have configured the settings on Picasa so that it can "see" all of your digital files, then you are able to view all the supplies you have on your hard drive. You will even find some you didn't know were there or that might have been misplaced:


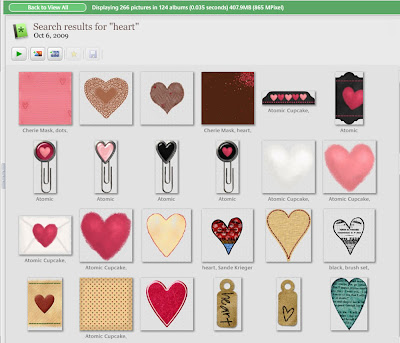
In the above example, you can see that I searched for the term "heart." This is a portion of the items that Picasa found for me --- both the items I tagged and the ones that have that term as a file name. Before using Picasa, I forgot I had some of the items, and wasn't using them because they were hard to locate.

One of the best features of the program is the ability to add tags. For those of you who are not familiar with that term, a "tag" is basically a descriptive caption that you apply to photo, digital element, etc. The idea behind tagging is when you add them to the items you wish to organize, it allows Picasa to find them again quickly and efficiently. So when you put a term, such as "brown" into Picasa's search engine, it locates the things with that file name, and anything you've tagged with that word. See below to view some digital elements that have been given tags:


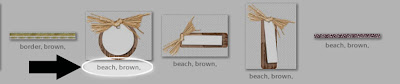
Even though it's small, you can see the item I've circled has the tags of "beach," and "brown." It would be similar with any other tags that are applied to a photo or digital element. It reduces time spent searching significantly.

To tag a photo in Picasa, it simply requires a "Control T" once Picasa is open. Many times, the tagging window will already be open (provided you are running the latest version, which at this time is version 3.5).


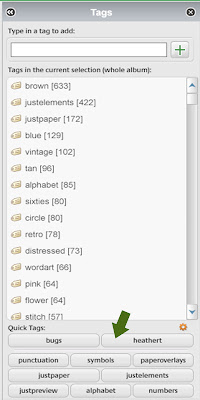
In the above picture, take a look at the top portion of the window. You can see a space to enter the tag you want. At the bottom, there is a section of "quick tag" buttons (see where I've placed the arrow). Quick tags buttons are places you can add the tags you most commonly use. When you tell Picasa what you tags want to apply to these quick tag buttons, you no longer need to type in your favorite ones. You can just click the buttons instead. The top two buttons will show the last two tags you applied to items in the Picasa database.

So, what do I think of Picasa so far? Here's my list of pros and cons.

Pros:
1 - Picasa is free and won't cost you a cent.

2 - The program can be used on either a PC or a Mac.

3 - Tagging definitely rocks. I can scrap so much faster when I'm looking for a specific element, paper, or color. Searching is a piece of cake now.

4 - It's nice having the tagging window open along side the view of the items I have showing. It makes searching and tagging really easy.

5 - Picasa allows you to mark certain photos with stars so you can find them later. You can also force the program to search for photos by looking for faces. If you click on the link I provided above for Picasa, it will explain how version 3.5 can be set up to apply name tags to photos as they are being downloaded from your camera.

6 - If you use Blogger, it has a feature which allows you to quickly and easily upload pictures from Picasa to your blog. I believe there is similar functionality if you want to upload to Facebook.

7 - There are other cool features that Picasa has to offer. I'm still learning what they are and how to use them. Honestly, there are too many to cover here. I'm excited to learn them and discover how they will speed up my photo and kit organization.

Cons:
1 - Sometimes when I'm applying a tag to an item, I might misspell it. Let's say I'm trying to type the name of the color "brown," but instead I accidentally put it in as "borwn." Unfortunately, my typo stays in the saved list of tags. I can delete it off of an item if the tag is wrong, but it still comes up if I incorrectly type it again. I find that a little annoying.

2 - Since Picasa is part of Google, the main place to get help is over at the Picasa message boards. That is OK for a short reference, but I find it difficult to
get help from Goggle staff. Maybe that's just because I don't know my way around yet. Thankfully, I haven't had any issues where I needed much help with the program.

3 - Tagging can take a long time if you didn't organize them as you go, but it isn't impossible. It can be done while you are watching TV, or even if you have just 15 minutes somewhere.

My overall verdict? Even with its drawbacks (which I still think are quite minimal), I think Picasa is a great program for organization. I have been happy with it by and large, and highly recommend it. Since the program is free, it would be easy to try out. And, if it turned out that Picasa isn't someone's cup of tea, they could move on to another program.

I've found the program to be a helpful tool and wanted to pass on what I've learned so far.

Thanks again for visiting...:)