Showing posts with label PSE. Show all posts

Check on Your Interoverts --- Not All Of Them Are OK, Either


We're hearing a lot of words and phrases right now --- many of which were not even around two months ago.  Living through a pandemic has necessitated it in some cases, and other new parts of our vocabulary have become buzzwords or trendy on social media.   There are certain ones I'm pretty tired of hearing, like "unprecedented times," "social distancing," and "quarantine," to name a few. 

There is another one, though, that I feel is a bit incomplete, which says:  "Check on your extroverts.  They are not OK."   Let me start by saying that I am not criticizing anyone who feels this blurb sums it up for them.  I'm not an extrovert and cannot speak to what their experiences with the pandemic are.  This is a great reminder for those of us who love these high energy, social folks. We should be keeping in touch with them and see how they are doing, as having to be social distant will be difficult.   As an introvert, however...I think there should be a companion statement which says:  "Check on Your Introverts.  Not all of them are OK."

Many of your introvert friends are having difficulties, too. Yes, there are many who are enjoying the chance to slow down, stay in, catch up on their Netflix watch list, and tackle projects that work and other facets of life have prevented them from doing normally. As an introvert myself, I have taken pleasure in these activities. There have been days when I enjoyed the slower pace, having everyone in the family home for dinner, and not having to drive the mom taxi. Honestly, though, I still miss people and the things we used to do together. This may sound funny, since it may seem contrary to your idea of an introvert, so let me clarify.

A few years ago, when my family was sitting at dinner, my daughter struck up a conversation about the difference between our personalities and introversion vs. extroversion. She identifies as an extrovert. She also recognized that I was an introvert. Her idea of a great time is to be with her friends as much as possible. She loves to meet new people and would rather be out doing something than at home. In contrast, I enjoy being home. I can pop on a movie or a great playlist of my favorite movie, and be content to do something while it's playing. I can do housework, some crafting, or cook in the kitchen. I'm also quite comfortable going to eat at a restaurant or a movie theater by myself. As we were discussing this, my girl came to the conclusion that I was anti-social. What I tried to explain was this is not the case. I'm not anti-social. I just socialize in a much different way than an extrovert.


Does this mean I don't like going out with other people?  No, it doesn't.  Am I against
 meeting new people? No, I'm not. I still like to grab lunch with some gals from church,
see a movie with my family, and love extended family gatherings. And, I take fitness
and ballet classes, where you will find me in the front row every single time if I can
manage it. I might often be content to take a back seat in a group conversation, but
when I dance, I like to be up front, in the thick of it all.  


When I go to fitness classes, I get there several minutes before the class starts to just sit and gather my thoughts. I can take that time to shed off any negative thinking, let go of things that happened during my day that I didn't like, or just have some peace. When I'm home with my family, I speak a lot. Answering questions regarding dinner, what needs to get done at home, and so on. I'm also giving constant reminders: get back to doing homework, please clean up after yourself, comb your hair, etc. Some days, I feel like a chatty parrot repeating the same stuff over and over. So, if I have a few minutes to myself before class starts, and I can relax and enjoy the silence, I relish that.


If, however, one of the peeps I know from class sits down and wants to chat, I can do that, too. Or, I can choose to listen as they talk amongst themselves and silently enjoy what is being said. There are times I enjoy just being a listening ear for someone else.


So, after that long ramble, what is my point?  Many introverts are not anti-social. We still need people...but the way we approach it looks different than it does for extroverts. I miss going to my weekly ballet class and taking time to chat with the other students and our teacher. We all appreciate the adult interaction, as it is often the only conversations we get that don't involve managing family decisions,  kids, work, etc. I feel great talking and letting each of us have our say.


I also miss going to events. Last July, I danced in a Flash Mob with a boatload of other Shine Dance Fitness students. There were some who know me who were surprised to see me in a bright yellow dress, dancing in the front row. It was real thrill for me to take part! Dance is one of my best outlets for self expression. I grabbed a selfie with one of the instructors afterwards, and went to dinner with a couple of my brothers and their spouses. This doesn't sound like an introvert's idea of a fun evening, but for me, it was awesome.


Additionally, three years in a row, I attended Brave Girl Symposium, which I went to by myself. The purpose of this event to is to find tools to heal, bravely live your best life, and connect with other like minded gals. I didn't go with any girlfriends in tow, but I saw friends I made at other Brave Girls events, and made some new friends, too. I danced, swam, ate, cried with, sang, practiced yoga, and attended classes with these gals. I asked to sit with groups of other ladies when going to the large meetings. I stayed up late to do some of the activities with all the attendees, and at other times, ducked out early to decompress after emotional speeches, or just to wind down and watch TV before bed (In case you are interested, I did a series of three videos where I show how to make the layout about the flash mob.  You can check them out here:)


And, here is what else I miss:

-I wish I could hug my mom. While I still see her weekly, since I try to be available to help her once a week, we don't give hugs because of the pandemic. I don't see my brothers because of social distancing guidelines. It bums me out.


-Not being able to do the normal things with other people is difficult. Unlike some of my extroverted friends and family, I'm not the life of the party, I've never been one to entertain at my house a ton, and may not make new friends every week. However, I still need people. I still miss my people. I really dislike the social distancing. I hate not being able to travel, or stopping to chat with a friend or acquaintance I see in the grocery store.


I know I'm not going to die.  I realize the pandemic isn't lasting forever.  It's just not always fun for me, either.  I'm mostly doing OK.  But often, stuff gets to me, as I'm sure there's stuff that gets to everyone else.  


Take it from an introvert. We're not all okay, either. So check on your introvert friends, too, and see how they are doing. See if they want to talk, text with you, or do a FaceTime chat.  I think in general, it's wise to check on your friends and family, whether we are an introvert, extrovert, or ambivert, we all still need connection.  

My Best Tips for Setting Up PSE For Scrapbooking


Hello everyone!  Does anyone else get a little excited when Adobe release a new version of Photoshop Elements is released?  I've had mine sitting on my scrapping desk since last November.  It took me awhile after the holidays ended to get it installed on my laptop.   

I've been wanting to show everyone how I optimize the Photoshop Elements Photo Editor (i.e. the workspace) for digital scrapbooking.  It takes about 15 minutes or so to get things set up, and then PSE can really go to work for you.  I made a video showing the process, because writing it all out and telling you is not the same as showing you.  Here's the video for you to watch if you wish: 


As outlined in the video,  actions, layer styles, and brushes will add greatly increase your power to create artsy and more realistic pages.  It's so much fun to create a page with realistic drop shadows, artistic photo effects, and layer styles that can transform your page embellishments.  Below are lists of my favorite actions, layer styles, websites that offer free brushes.  Try them out and enjoy!


Favorite Photoshop Actions
Check out the CoffeeShop Blog for a whole 
slew of actions: http://www.thecoffeeshopblog.com/p/images-of-all-of-actions.html
WendyZine Actions   (her actions are great for so many things that are hard to do in PSE)


Favorite Paid Layer Styles


Photoshop Brushes
Check any of the above listed digital scrapbooking shops, or your favorite digital scrapbooking supplies store


Alright guys...get your PSE editor set up, download some actions, layer styles, and brushes and get to it!


Last Minute Graduation Cards


Well, as you can guess from the title of this post, I needed some cards for a couple of graduates, realized that my stock of pre-made cards were gone, and so I scrambled to get some done before we had to give them out.

The nice thing about these cards is that you can customize the color (in most cases) to match the color of your graduate's school or university.  I used the Leaving the Nest: Graduation kit by Traci Reed.  Click here to get the kit:


As for the physical supplies used in the cards, the links are below.  If I don't have a link for the actual product or a substitution, I'll also make a note of that: 


double loop picot trim (this is a close substitution)
Brown Gingham Ribbon (a substitution)
Rusty Hinge Distress Ink (used in the video, but not pictured)
Glue Dots Dispenser  (not shown in the picture, but used in the video)
Also, use the adhesive of your choice if you want something else in addition to the Glue Dots

Here's the video showing how to make the cards: 


Let me know if you make cards based off of the ones in my video, and feel free to comment with future post or video ideas, suggestions, or constructive feedback.  Thanks again for spending part of your day here.  Have a good one!


Create A Cool Title Treatment (Like This One!)


One thing many people overlook in regards to Photoshop Elements is that not every technique is complicated or requires a lot of steps.  The title treatment I used here so simple to create and requires the use of only two tools in Elements.  It looks difficult, but takes only minutes to do.  Watch the video I made and see how you can make a title similar to this one:


The kit I used is so beautiful, and it's called Lavender and Lace by SeaTrout Scraps.  You can purchase the kit bundle here: Lavender and Lace Collection.  You can see the kit contents below:


Font used:
Saloon Regular and Always in My Heart


If you guys like this technique and you try it, leave me a link to the site where you posted it. I'd love to see!

Thanks reading my post and I'll see you guys soon!

Beginner Handlettering on a Layout


If you've looked around the web lately, it seems like there has been an explosion of hand lettered items...fonts, invitations that have been hand lettered, instructional books on how to do it, and more.

And, if you have been on Pinterest in the last 6 months, bullet journaling, and hand lettering in those journals is all over it.  I have been dying to try lettering since then, and decided to just plow ahead and give it a shot.

Obviously, I am just starting out as a beginner, and I in no way stating that I have this skill down or that I'm an expert in any way, shape or form.  I am willing to learn, and decided to take you along as I made my first scrapbook page with a handwritten element on it (the word "snow" on the layout above).

Even though my hand is shaky, and I know it will take a lot more practice, I'm really enjoying this process.  And I know that as I go along, I'll get better hopefully can share what I learn.

Here's the video I created showing how I made my hand lettering.  Please note that I used my Apple Pencil, iPad Pro, and the Procreate app to use do this word art.  I then imported it as a .psd file from Procreate and sent it to myself in an email.


Digital Kit used:  Arctic Exploration Kit by Katie Pertiet at Designer Digitals:


 Here's a list of awesome hand lettering blogs you should check out:

Hello Brio
Random Olive
The Postman's Knock  (focuses a bit more on calligraphy, but there are some brush lettering resources as well)
Dawn Nicole Blog

I hope you guys find this helpful...and if you feel so inclined, would you let me know if you are a hand letterer?  Have you ever tried it?  Let me know!

Talk to you all later,


My Christmas Album Pages for 2016


I recently finished up Journal Your Christmas, and wanted to show you the completed pages.  Please note that I am only sharing the pages right now...I figured I would do a separate post about getting the pages printed and into a book or album at a later date.

The key to getting an album like this done is keeping it simple.  As I mentioned in my earlier post about holiday albums,  I used a set of 6 x 8 templates and a set of Christmas kits I picked out ahead of time (I will provide links to these products down below).

When it came time to make each day's page, I just opened a template in PSE, saved it as a new file, plopped in any papers and embellishments I wanted to use, and added journaling.

A few years back, I made a font of my own handwriting.  This is pretty handy when you want to include your own writing, but are short on time.  This is another tool in my arsenal that helps me get my pages done quickly and easily.

If you are interested in turning your handwriting into a font, here are a couple of sites that allow you to do so.  One of the sites provides this service for free, and the site requires payment.  I included both so my readers could choose the one that suits their needs.

Paintfonte

Fontifier


Here's my latest video, with a slide show of each of the layouts I did for this project.  I hope you'll watch and get a feel for how the pages all tie together.


If you want to get a better look at each of the pages, you can find them at either of these two places:


JYC 2016 Photo Album on my Facebook Page
 
My Scrapbook dot com gallery


Here are the page kits I used:

DYD 6 x 8 Templates by Just Jaimee


Holly Days Advent Calendar Kit by Amy Wolff:


Holly Days Element Pack:


Holly Days Paper Pack:


List of Fonts used on my layouts:

Tangie Momraths: part of this font package
 2Peas Gift
LDJ Knuckle Type
Cry Kitty
Impact Label Font (I used a different labelmaker font that is no longer available, but this one is a close substitute for it)
Thirsty Script
Snowinter
Autumn in November
Penelope Anne
Outlaw
Pussycat
Bebas Neue
Sketchetica
Creampuff
Coolvetica
Stamp
Grutch Shaded
Blackhawk

Wow...that's 19 fonts!  I did warn you that I was a font junkie, right?

Anyhow...I appreciate you stopping by here, and I hope you found some inspiration you can use in your own holiday album or project.

Simple and Elegant Gift Tags


When I get really busy during the holidays, I find that the best thing to do is to stop what I'm doing, and make a little time to craft something.  I've also learned that if I focus on a smaller project rather than a big one, I feel more relaxed and more satisfied with what I've made when the project is finished.  It's one little way that I slow myself down and enjoy this time of year, which is great for letting go of that holiday stress. 

My latest YouTube video shows you how fun and easy these little tags are.  I hope you'll give it a watch: 


Here's a list of the supplies I used to make these cute little goodies.  And just a little disclaimer:  If I cannot find a link to the supplies below, or they are discontinued, I will link you up to other projects that are similar and would work just fine in their place. 

And, as always:  if you prefer to use items from your stash, do it!  I'm a big proponent of using what we already have.  


Traditional Supplies: 


American Crafts Red Ribbon (this is a close substitution)
Clear Scraps Shapes & Albums (not all the shapes I used are there, but some of them are)
Clear Scraps At Scrapbook dot com (they have some shaker and chipboard shapes that could be used for this, too)
Baker's Twine (This is a pretty good deal for all of these spools)
A standard sized hole punch  (found at most office supply stores)
Scissors
A black gel or writer pen, if you want to write on "to" and "from" (not pictured)

I have some blue ribbon, some photo squares, and some adhesive pearls in the picture, but they ended up not making it into this project, FYI.


Here's another picture of the tags, as well as a couple of gifts I attached them to: 


I hope you like these tags, and will make some of your own, even if it is just for your own enjoyment!

Thanks for taking time from your day to take a look...:)


Using the iPad Pro + Apple Pencil as a Pen Tablet for Digital Scrapbookers


My husband recently gifted me with a new 9.7 in. iPad Pro and an Apple Pencil to go with it.  At first, I wasn't sure what the heck I'd do with the pencil...I didn't know if I'd do more with it than use it to click around with as I navigated between apps on my iPad.

One night, he and I were talking about my old Wacom Bamboo Tablet, and I was wondering if I could still find drivers for it, since it's getting to be an older device now.  We started talking about the idea of me using my iPad Pro and Apple Pencil as a pen tablet...I just needed an app to enable that functionality.

He had used an app called Duet at work, and thought it would be a good one for me to try, so I gave it a go.  It worked pretty well, as you can see from the the video demo I linked for you above.  I'm also kind of intrigued by Astropad, which I'm trying to decide if I want to buy or not, so that may be an option for some of you if you choose not go with Duet.

It took me a little longer this time to get this video ready, because I had a bit of trouble with the Apple Pencil, as it was giving me serious writer's cramp.  I also wasn't sure which angle to set my iPad at to be used most comfortably.

In the end, I decided to lay the iPad down flat, and used a couple of accessories with the iPad to help make the experience more comfortable, and now using it is a snap.  Granted, this set up only works with Apple Devices as far as I know, but if you have these goodies on hand anyway, you are all set and have a pen tablet at the ready the next time you want to scrap with one!


Let me know what you think of the video, and if you think you'll try using your iPad Pro as a pen tablet...I'd love to get your input on how the experience went for you.

Aside from my MacBook, iPad and Apple Pencil, here is a list of the supplies I used in my video:

Mudder Tablet Drawing Artist Glove

Ztylus Apple Pencil Case

Summer Mini Template:  unfortunately, it's discontinued.  But, here is a link to Julie Fei-Fan Balzer's stencil page on Scrapbooking.com  There are a few face stencils on this page your could easily use instead: Julie's templates at Scrapbook.com

Procreate App

Beep Beep Digital kit by Jen Allyson: Discontinued.  Here is another very similar Digital kit on the same theme by Kim Jensen at the Lilypad: City Streets Elements kit  
and City Streets Papers

I think that is everything --- so if any of you have questions, comments or constructive feedback, feel free to holler!  I know I've probably forgotten some things I wanted to include in the video, so ask away if you have further questions.

Thanks for stopping by today!

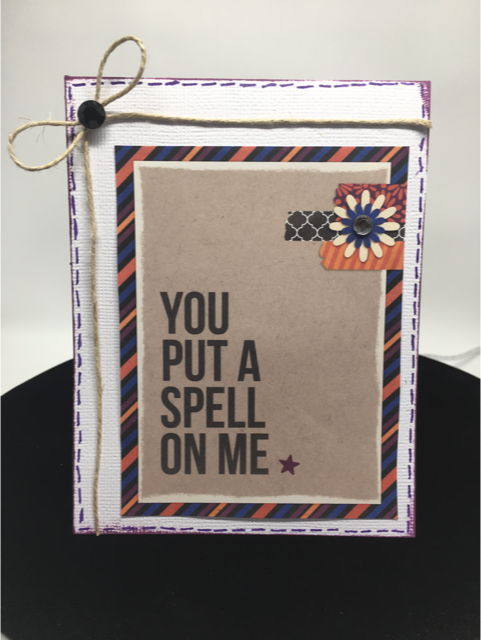
Video: Set of Four EASY Halloween Cards

Halloween is almost here, and I wanted to make a fun hybrid project in honor of the day.  Rather than focusing on treat bags or decorations, I prefer to make cards!!


I personally think that Halloween cards should be as popular as Christmas or Birthday cards...there's so many cool and silly ways you can use the theme of Halloween to create an adorable card to send to a friend.  

To make my cards, I used two kits from a collaboration done by Sahlin Studio and Britt-ish Designs who both create designs for the Lilypad: 


I divided this tutorial up into 2 videos, since I thought watching one very long one might get tiring.

 Here is part one: 


Also, here are the other digital supplies I used (or close substitutes) on these cards if you are curious or want to pick them up yourself:

Bebas Neue Font

Digital Distressing kit by Nancie Rowe Janitz

The Part Two video:


 Traditional scrapbooking supplies used (all are clickable links):

Hero Arts Yellow Gemstones
Recollections Adhesive Rhinestones - Black
The Paper Studio Le Petites Mini Paper Bows
3/8 in. Orange Gingham Ribbon
Queen & Co. Rhinestones in Snowflake
American Crafts White Cardstock
Aleene's Original Tacky Glue
Mini Jute String
Gelly Roll Pens in Black and Purple
Mini Glue Dots
Ranger Distress Ink in Seedless Preserves
Ranger Archival Ink in Black
Epson Matte Presentation Paper


Here is a close up look at the finished cards if you want to get a closer look:


Have a splendid day!!

Using Photoshop Brushes on a Layout


You guys wanna see how easy and fun it is to use brushes on a digital scrapbook page?  If so, then I have a helpful video for you on how to do just that.  It's a follow up of my previous one, where I demonstrated how to either load or install brushes.

To create this page, I used Mye De Leon's Fleeting kit, which is so fun and pretty:


http://www.snapclicksupply.com/fleeting-complete-kit


I also used this add on brush kit of hers to demo using brushes to create part of a title:


http://www.snapclicksupply.com/fleeting-stamps

And, last but not least, I also incorporated some of these fun tapes from this coordinating add on kit:


All three of these great kits can be found at the Snap Click Supply Online Store, if you are interested in picking up these kits or any others. 

Here's the video, if you like it and wouldn't mind, then give it a thumbs up on YouTube and subscribe to my channel.  I would love to have you as followers: 


Also, as a thank you for watching my video and visiting my blog, I have a free template download for you.  I recreated the bones of my layout into templates --- there's one in 8.5 x 11 and another in the 12 x 12 size. 


Thanks again, for taking time to be here.  Have a wonderful day!!

Video: Loading vs. Installing Brushes


Here's a video on my thoughts about installing and loading brushes, as well as the advantages to each method.

I hope you guys enjoy watching this --- I think Photoshop Brushes don't get all the love they deserve.  You can do so many cool things with them, and you are limited only by your imagination!  Here are some of my favorite ways to use brushes in PSE:

 Painty splats made with brushes can be awesome and unique ways to ground a photo, and it's nice variety from using standard photo mats.


Another fun use is to to ink or paint up the edges of a patterned or solid paper, like I did here with the aqua cardstock: 


Brushes can also add fun texture to a page that needs that little extra "something to make a page feel finished.  On this "Speed Racer" page,  I used a brush that looks like tire tread marks to reinforce the theme of the page.


In a few more days, I will have a video that will talk you through the process of creating a new layout using brushes, and it will show you how fun and easy they are to work with.

Let me know what you think of the video and/or this post.

I appreciate you stopping by and have a great day!