Showing posts with label featured. Show all posts

Plan With Me --- September 2017


Hey everyone, I hope you are all doing well and enjoying the change of seasons.  Here in Idaho, there's lots of beautiful Fall color going on:


Here are my page spreads for September.  I hope you enjoy them.  I will include appropriate links for any items and/or products I used on my spreads (or any borrowed ideas I incorporated).  I always try to give credit to others who have inspired me.


 First up is my September calendar, and in place of a habit tracker, I decided just to leave a space to write some things I accomplished this month.  I thought it might be more encouraging to actually record my successes instead of trying to keep up with a habit tracker.  I often forgot to fill in the tracker or got frustrated because I didn't get as much done as I hoped, so I decided to give it a rest for now.  I felt a lot more productive and positive seeing what I got done, rather than what I didn't.


Lettering Style Used for the Gratitude Log Title: Love Stamps
Where to find the September 17th Oodles of Doodles: Sept. 2017 Oodles of Doodles


 Here is what I did for my gratitude log, Oodles of Doodles challenge, and my August memories.  It was especially fun to document the eclipse!  I wasn't sure if I'd be able to draw the sun with the corona, but I think it turned out pretty good!

Here is a link to my pinterest board that shows the lettering style I used for my title on this page: title lettering style


And, for my mood tracker, I decided to change it up again, so I went with another linear format.  I had a light bulb moment where I remembered that abacuses (or abaci?)  are a great way to show a linear record of something, so I came up with my own abacus after looking at google images and deciding what type I wanted to draw.  It's fun, but it's also super easy to see which of my moods are predominating.

Lettering style used on my September Memories Page: Nova Lettering Style


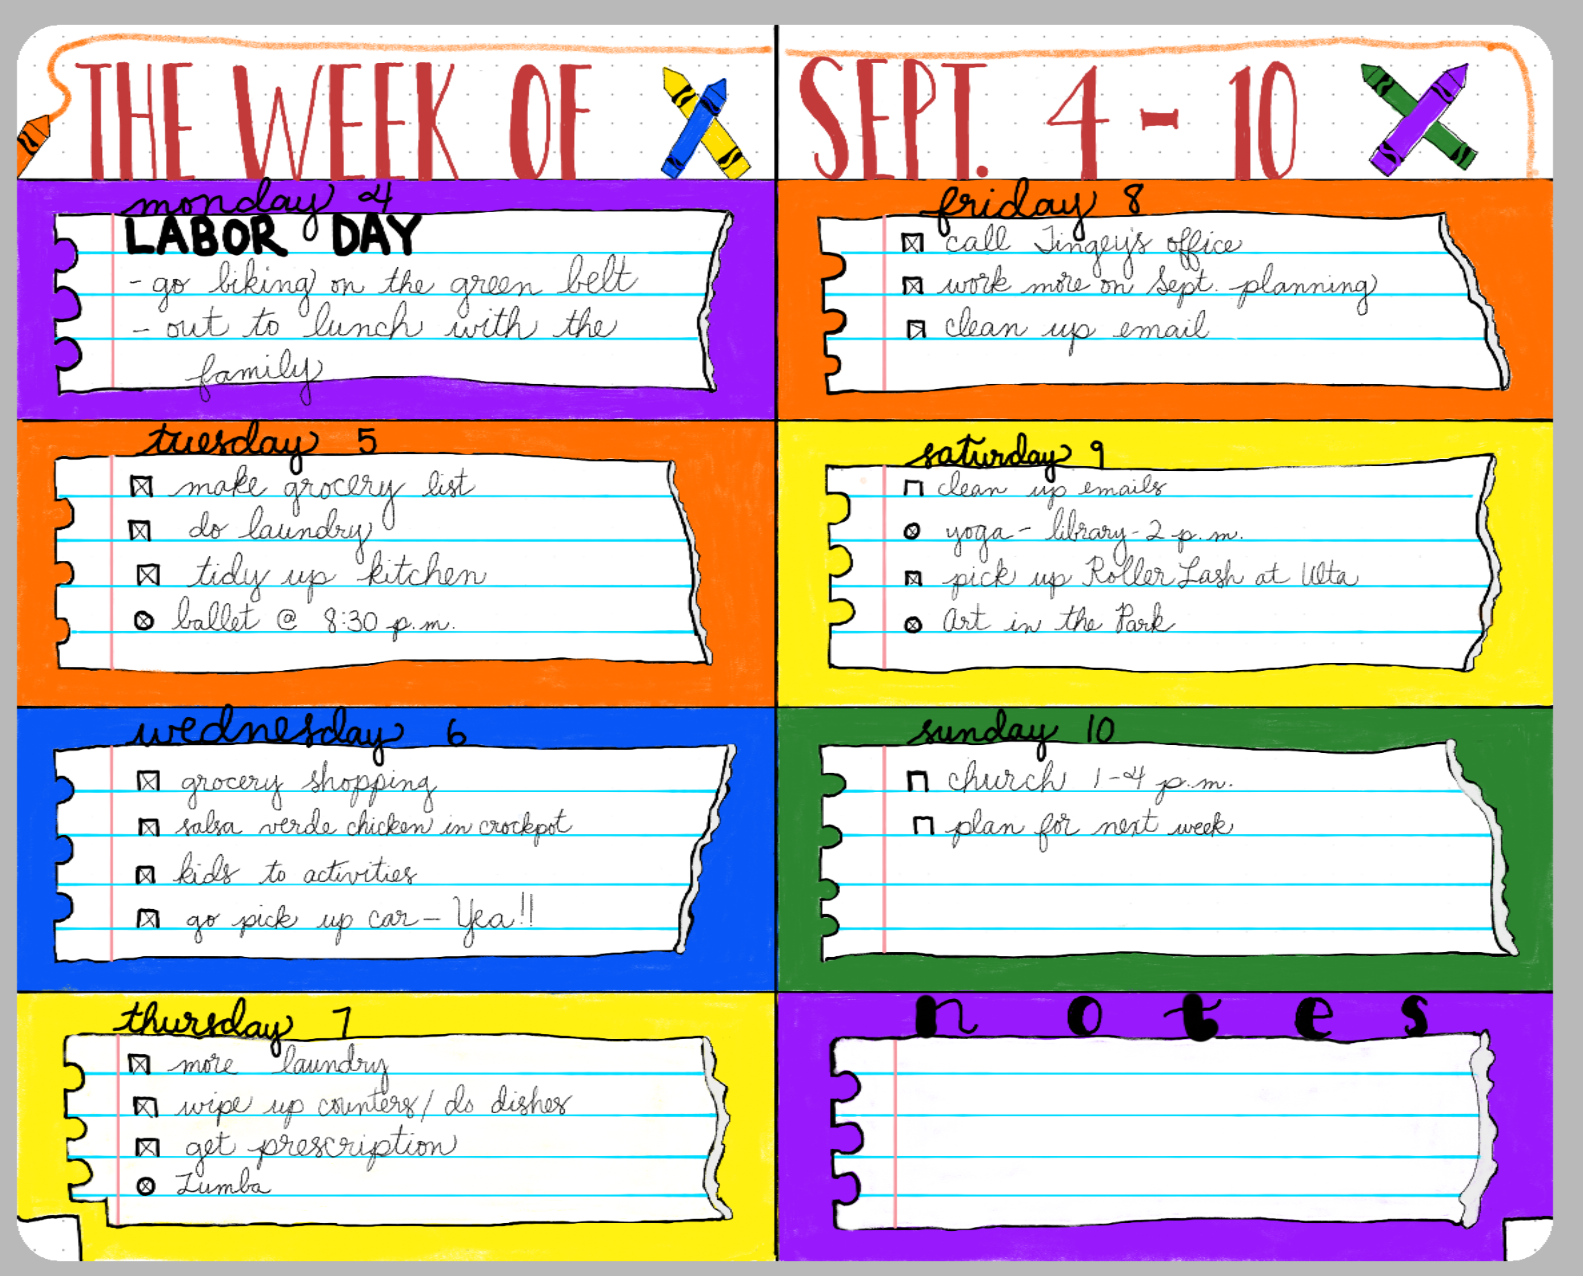
 The last spread I wanted to share with you guys is the one I'm the most proud of.  I came up with the idea on my own.    I decided to make one of my weekly Spreads with a school theme, and for each of the blocks I created for a day of the week, I made it look like a torn piece of spiral notebook paper:


Check out the video I posted to get a better idea of how I created the torn edges:


Also, I said that I would write down the colors I used from each palette in the Morpholio App in case you wanted to recreate this yourself:

Purple: from the Engineering color scheme (it's the only purple in that grouping).
Orange: from the Automotive color scheme (in the second row, the second color from the right edge).
Red: find it in the Automotive scheme (in the the first row, just after the darkest black).
Yellow: from the Diagrams scheme (first row, third color from the left).
Blue:  find it in the Comic Art scheme(second row, the only blue in that grouping)
White: You'll see it in the first color scheme at the top of the Palettes tool, in the grouping called "Trace."  It's the only white there.
Light Blue lines on Notebook paper: this color's in the Engineering scheme.  You'll see it on the second row of hues, right after the lime green color.
Black:  also from the Trace color scheme.
Faint gray used to create paper tears: The very first color in the Automotive palette. 


Alright then, guys!  I hope you are enjoying bullet journaling this month, and feel free to contact me with any questions.  Let me know what has been working well in your bullet journal this month.

Thanks again for being here!

Digi Paper Trend - Tropical


 Do you ever miss the many different scrapbooking magazines that used to be available?  I used to see them so frequently, not only in the local scrapbooking store (aka LSS), but in pretty much every grocery store I frequented, bookstores, gas stations, and more.  Nowadays, it's harder to find them...thankfully, there's still Scrapbook & Cards Today.  I'm grateful for it, and love to read it, but I still get sad that there's only scrapbooking publication left.   Back in the day, when there were plenty to choose from,  I felt like the magazines were the best source for spotting papercrafting trends.

I know there's a ton of inspiration online, but just trying to find info on the current year's trends is a bit hard.  It feels like most posts or online articles about what's trending are focused on one brand, and I think that it's nice to be able to look across all the offerings available.  There was one blog I used to visit that had a series on trends, but they stopped posting about that about 2 years ago.

So, after doing my own research on this year's trends both in print and online,  I decided to do videos and blog featuring a current trend.   Here is my first video in this series, which showcases the "tropical" trend:


I created a Pinterest board for things I found that show the popularity of Tropical Chic, which does have scrapbooking layouts and cards, but also food ideas, home decor, jewelry, party favors, and more.  If you have any doubts as to how well-liked this trend is, the objects I've gathered here should put them to rest:

Pinterest board - Tropical


Since trends are seen across multiple areas, it's no surprise that it's also popped up into paper crafting.  I was easily able to find tropical- themed digital scrapbooking kits.  The one I chose to use for the projects I'm showing you today were made with the "Pineapple of My Eye" digital kit by Traci Reed and Jady Day Studio at Sweet Shoppe Designs:

Get The Pineapple of My Eye Kit Here


The first project I'm sharing here is my digital bullet journaling spread.  I imported a jpeg image of a single pineapple as well as a white ribbon with little pineapples on it.  I used the ribbon as a border and placed a little pineapple next to each day of the week.  From there, I just used my Apple pencil to doodle in the Morpholio Journal App and added the writing for each section of the spread.


,


Up next is this scrapbook page I made about a pool day we had during our DisneyWorld vacation.   The pool was at the Music Resort, and while it did have pools shaped like musical instruments,  the main feel was more tropical, so this kit was perfect. 


I couldn't resist using the kit to make a card...this pineapple element was calling to me, so here you go:


Here's the list of traditional supplies I used for this card.  If I couldn't find a link to a particular product, then I provided a link to one that's similar:

Pink Bazzill Cardstock
Recollections colored rhinestones
silk flower embellishments
raffia
a button from my stash.  You can use anything you have on hand...I fully encourage using your stash whenever you can.


I hope you guys enjoyed my take on the tropical trend...if you feel so inclined, go and try it out for yourself!

See you all later,


Last Minute Graduation Cards


Well, as you can guess from the title of this post, I needed some cards for a couple of graduates, realized that my stock of pre-made cards were gone, and so I scrambled to get some done before we had to give them out.

The nice thing about these cards is that you can customize the color (in most cases) to match the color of your graduate's school or university.  I used the Leaving the Nest: Graduation kit by Traci Reed.  Click here to get the kit:


As for the physical supplies used in the cards, the links are below.  If I don't have a link for the actual product or a substitution, I'll also make a note of that: 


double loop picot trim (this is a close substitution)
Brown Gingham Ribbon (a substitution)
Rusty Hinge Distress Ink (used in the video, but not pictured)
Glue Dots Dispenser  (not shown in the picture, but used in the video)
Also, use the adhesive of your choice if you want something else in addition to the Glue Dots

Here's the video showing how to make the cards: 


Let me know if you make cards based off of the ones in my video, and feel free to comment with future post or video ideas, suggestions, or constructive feedback.  Thanks again for spending part of your day here.  Have a good one!


How to Make Custom (and unique) Clipping masks


Have you used the shape tool in Photoshop Elements for a clipping mask lately?  And if you have, did you simply use a square or rectangle?  Well, then, try mixing it up a little and using basic shapes to create a composite shape.  You can come up with some fun figures to clip your pictures into. 


In the page I posted above about the Oregon Coast Aquarium, the comma or swirly shapes along the right side were created using the custom shape tool, with the half circle shape within in that.  You can watch the video below to see how I did it: 


Here's the kit I used to make my page: 


Here are the other pages I made that unique clipping masks: 


The page below has the half circle shape combined with a vertical rectangle.  Another fun effect for this page is that I used the text tool to create text on a rounded path, snugged it up closely to the photo mask, and merged (or combined it with the custom mask I just created.  So now, not only did I combine the two shapes together, the text adds another fun look to this clipping mask.  For a little more visual interest, I created an outline stroke that I offset from the clipping mask.  I love the way it turned out!  I can't link you to this kit, as it is no longer for sale, but it is the Snap Click Repeat kit by Celeste Knight.


The next page I made used these shapes: 


This was the first page I made using composite shape clipping mask.  I was extra proud of it because it made the Two Peas digital newsletter when that site was still up.  You can see from the example above I used a horizontal rectangle this time, then two quarter circle shapes.  I used the skew command (Image > Transform > Skew) to more or less make the rectangle a parallelogram, then skewed the half circles as well.  I rotated the quarter circles in opposite directions, then plopped them on the ends of the parallelogram, then merged the layers.  In the layout below, after I was finished making the shapes and duplicated them to create two other copies of the shape for my photo clipping masks.  I also made the shapes a little taller and not as wide so they'd be a more ideal size for my photos.   I also put an outline stroke around the clipping mask to make the shapes really pop from the page.   This kit I used here is by Jen Martakis.  It's another older one and has been discontinued.


So tell me...have you tried making clipping masks using this technique?  Or is it something you'd like to try?  Let me know if you get the chance. 

Thanks again for reading my post and I hope you'll check out the video.  Enjoy your day!


Simple and Elegant Gift Tags


When I get really busy during the holidays, I find that the best thing to do is to stop what I'm doing, and make a little time to craft something.  I've also learned that if I focus on a smaller project rather than a big one, I feel more relaxed and more satisfied with what I've made when the project is finished.  It's one little way that I slow myself down and enjoy this time of year, which is great for letting go of that holiday stress. 

My latest YouTube video shows you how fun and easy these little tags are.  I hope you'll give it a watch: 


Here's a list of the supplies I used to make these cute little goodies.  And just a little disclaimer:  If I cannot find a link to the supplies below, or they are discontinued, I will link you up to other projects that are similar and would work just fine in their place. 

And, as always:  if you prefer to use items from your stash, do it!  I'm a big proponent of using what we already have.  


Traditional Supplies: 


American Crafts Red Ribbon (this is a close substitution)
Clear Scraps Shapes & Albums (not all the shapes I used are there, but some of them are)
Clear Scraps At Scrapbook dot com (they have some shaker and chipboard shapes that could be used for this, too)
Baker's Twine (This is a pretty good deal for all of these spools)
A standard sized hole punch  (found at most office supply stores)
Scissors
A black gel or writer pen, if you want to write on "to" and "from" (not pictured)

I have some blue ribbon, some photo squares, and some adhesive pearls in the picture, but they ended up not making it into this project, FYI.


Here's another picture of the tags, as well as a couple of gifts I attached them to: 


I hope you like these tags, and will make some of your own, even if it is just for your own enjoyment!

Thanks for taking time from your day to take a look...:)


Using the iPad Pro + Apple Pencil as a Pen Tablet for Digital Scrapbookers


My husband recently gifted me with a new 9.7 in. iPad Pro and an Apple Pencil to go with it.  At first, I wasn't sure what the heck I'd do with the pencil...I didn't know if I'd do more with it than use it to click around with as I navigated between apps on my iPad.

One night, he and I were talking about my old Wacom Bamboo Tablet, and I was wondering if I could still find drivers for it, since it's getting to be an older device now.  We started talking about the idea of me using my iPad Pro and Apple Pencil as a pen tablet...I just needed an app to enable that functionality.

He had used an app called Duet at work, and thought it would be a good one for me to try, so I gave it a go.  It worked pretty well, as you can see from the the video demo I linked for you above.  I'm also kind of intrigued by Astropad, which I'm trying to decide if I want to buy or not, so that may be an option for some of you if you choose not go with Duet.

It took me a little longer this time to get this video ready, because I had a bit of trouble with the Apple Pencil, as it was giving me serious writer's cramp.  I also wasn't sure which angle to set my iPad at to be used most comfortably.

In the end, I decided to lay the iPad down flat, and used a couple of accessories with the iPad to help make the experience more comfortable, and now using it is a snap.  Granted, this set up only works with Apple Devices as far as I know, but if you have these goodies on hand anyway, you are all set and have a pen tablet at the ready the next time you want to scrap with one!


Let me know what you think of the video, and if you think you'll try using your iPad Pro as a pen tablet...I'd love to get your input on how the experience went for you.

Aside from my MacBook, iPad and Apple Pencil, here is a list of the supplies I used in my video:

Mudder Tablet Drawing Artist Glove

Ztylus Apple Pencil Case

Summer Mini Template:  unfortunately, it's discontinued.  But, here is a link to Julie Fei-Fan Balzer's stencil page on Scrapbooking.com  There are a few face stencils on this page your could easily use instead: Julie's templates at Scrapbook.com

Procreate App

Beep Beep Digital kit by Jen Allyson: Discontinued.  Here is another very similar Digital kit on the same theme by Kim Jensen at the Lilypad: City Streets Elements kit  
and City Streets Papers

I think that is everything --- so if any of you have questions, comments or constructive feedback, feel free to holler!  I know I've probably forgotten some things I wanted to include in the video, so ask away if you have further questions.

Thanks for stopping by today!

Video: Set of Four EASY Halloween Cards

Halloween is almost here, and I wanted to make a fun hybrid project in honor of the day.  Rather than focusing on treat bags or decorations, I prefer to make cards!!


I personally think that Halloween cards should be as popular as Christmas or Birthday cards...there's so many cool and silly ways you can use the theme of Halloween to create an adorable card to send to a friend.  

To make my cards, I used two kits from a collaboration done by Sahlin Studio and Britt-ish Designs who both create designs for the Lilypad: 


I divided this tutorial up into 2 videos, since I thought watching one very long one might get tiring.

 Here is part one: 


Also, here are the other digital supplies I used (or close substitutes) on these cards if you are curious or want to pick them up yourself:

Bebas Neue Font

Digital Distressing kit by Nancie Rowe Janitz

The Part Two video:


 Traditional scrapbooking supplies used (all are clickable links):

Hero Arts Yellow Gemstones
Recollections Adhesive Rhinestones - Black
The Paper Studio Le Petites Mini Paper Bows
3/8 in. Orange Gingham Ribbon
Queen & Co. Rhinestones in Snowflake
American Crafts White Cardstock
Aleene's Original Tacky Glue
Mini Jute String
Gelly Roll Pens in Black and Purple
Mini Glue Dots
Ranger Distress Ink in Seedless Preserves
Ranger Archival Ink in Black
Epson Matte Presentation Paper


Here is a close up look at the finished cards if you want to get a closer look:


Have a splendid day!!

Using Photoshop Brushes on a Layout


You guys wanna see how easy and fun it is to use brushes on a digital scrapbook page?  If so, then I have a helpful video for you on how to do just that.  It's a follow up of my previous one, where I demonstrated how to either load or install brushes.

To create this page, I used Mye De Leon's Fleeting kit, which is so fun and pretty:


http://www.snapclicksupply.com/fleeting-complete-kit


I also used this add on brush kit of hers to demo using brushes to create part of a title:


http://www.snapclicksupply.com/fleeting-stamps

And, last but not least, I also incorporated some of these fun tapes from this coordinating add on kit:


All three of these great kits can be found at the Snap Click Supply Online Store, if you are interested in picking up these kits or any others. 

Here's the video, if you like it and wouldn't mind, then give it a thumbs up on YouTube and subscribe to my channel.  I would love to have you as followers: 


Also, as a thank you for watching my video and visiting my blog, I have a free template download for you.  I recreated the bones of my layout into templates --- there's one in 8.5 x 11 and another in the 12 x 12 size. 


Thanks again, for taking time to be here.  Have a wonderful day!!

Some Hybrid and Digital Goodness


It's been way too long since I did a hybrid project, so I thought I'd take one on.  I made this cute altered tissue box cover using some digital papers that I had printed up on a laser printer.  Previously, I had done this project using traditional scrapbooking paper, so I wanted to give it a go with digital papers.  You can see this tutorial on the Sweet Caroline Studio blog.

I learned a couple of things along the way, and thought I would pass them along to you.  While technically I think you can use inkjet paper, I liked getting laser prints done at my local office supply store because I just wanted to slather on the Mod Podge without worrying about the ink smearing.  My office supply store offered both 8.5 x 11 and 12 x 12 prints, but I chose the letter-sized prints because they were less expensive. The very helpful gals at The DigiChick gave me some great pointers on using ink jet paper for hybrid projects.  They told me that using Epson Presentation Paper for ink jet printers works pretty well for hybrid projects.  I will have to try that out later and see if it works.  For now, I'm sticking with laser prints.

Additionally, I went with the matte finish Mod Podge, which doesn't dry sticky, unlike the gloss finish.  Using Mod Podge does create a bit of bubbling and buckling, but don't let that freak you out.  For the most part, everything dries flat and the bubbling that remains is hardly noticeable.  

I was happy with the way the project turned out, and wished I had done up a few before the end of the school year.  These would make a fun teacher gift!  

If you get the chance, I encourage you to make a hybrid project of some sort with your digital papers.  I admit I feel a bit intimidated by hybrid projects, but once I get started and let go of the idea that it has to look "perfect," I actually have a lot of fun.  I will have to do more hybrid in the future. 

Also, I made a layout of my youngest using Celeste Knight's Sweet Briar Kit.  He had the cutest little facial expressions when he was a baby.  I just love looking at these photos...sigh....


Thanks for stopping by!


A Silly Photo and Some Fun News

Hey everyone!  I hope you are enjoying life wherever you are.  I wanted to share with you a photo that pretty much sums up how things go whenever we take family photos.  Like many of you, we celebrated Mother's Day a couple of weeks ago.  I like to try and get a photo with all of my kids on that day.  While we were getting set up to get pictures taken, a couple of our neighbors were out walking their dog and offered to snap a few shots for us.

I have to remind my kids that I'd like to actually get some good pictures each year (or else everyone in the photos will have rabbit ears and tongues will be sticking out of all their mouths).  Our neighbors got what we hoped would be some great pictures of our family.  I guess you can tell where this is going.  The three older kids listened well, but my youngest apparently had other ideas:


Little stinker!  My hubby was so mad I thought steam was going to start coming out of his ears.  But oh well...LOL!  I figure I can use this picture or blackmail later.  Somewhere during his high school years, I'm sure some teacher or classmate will request funny pictures from his childhood and I will be happy to hand over this one! 

In any event, I'm still going to scrapbook this photo, because this is how life really is for us on a regular basis.  I'm hoping that this will get you thinking about the everyday photos you take and how you scrapbook them.  I'm kicking around the idea of a weekly blog post centering around snapshots.  I will elaborate more on this in a few more weeks.  

In the meantime, here's something I'm excited to share with you:  I'm fortunate to be a part of Celeste Knight's Sweet Caroline Studio creative team.  Celeste designs for Pixels and Company, and you can see her digital kits here.  Her work is gorgeous, and if you get a chance, you should definitely check it out.  Here are a couple of my pages my with her kits:


Right now, I'm really having fun using her darling journaling cards.  I'm not a Project Life enthusiast, so I haven't played with these cards much.  However, since I do favor clean, simple design, these cards are a perfect little parking spot for journaling and even photos.  

And, last but not least, I want to send a heartfelt thank you to the three designers who were kind enough to allow me to be a part of their creative teams during the last two and half to three years.  Kerry, Jen, and Janet, I had so much fun and appreciated the opportunity you gave me to work with your amazing designs.  I know you've all moved onto other adventures and wish you the best.  


And now, if you've read this far, I was hoping you'd answer a question.  Are regular, everyday photos mostly what you scrap?  If not, what do you use in your scrapbooks? What do you do if you have a photo you want to scrap, but you don't like something about it (whether it's blurry, a boring shot, someone makes a face, the room is messy, the lighting is bad, etc.).  I'd love to hear your thoughts!


I Drew a Face!

I've been working some lately in my paper art journal (I still like doing the digital pages, too...you'll see me kind of jump back and forth between digital and paper projects).  As I've been browsing work by other art journalers, I've admired how they can draw faces, and wanted to try it myself.  I know this isn't going to win me any art contests.  But seriously...I haven't drawn a face probably since elementary school.  It's so true that we all, at some point, notice that others are better at a certain skill than we are, and often stop doing it.  This was true for me with drawing.

Even though it was scary, I looked around for a beginner's class, and found Jane Davenport's Draw Happy online workshop.  This is a mini-class to kind of jumpstart a beginner and get them going.  I'm not going to lie --- it was intimidating at first, and just doing some of the exercises took me awhile.  My first few attempts, I just sat there, trying to turn off all the negative talk in my head.  I didn't necessarily like the first few things I drew, but it got me over the fear of trying.  And, since I did my drawings in my art journal, I figured that the only one who would see them would be me.  This was my third or fourth attempt, and wanted to just go for it using the supplies I had.  And guess what?  I didn't hate it when I was all finished!

The cool thing about drawing faces in an art journal is that it's OK if something on your face is out of proportion or even not a typical flesh tone.  I purposely gave mine pink and green hues.  Even if  something is drawn out of proportion, it makes for a really cool page.

So what do you do if you aren't ready to draw your own faces by hand?  The Crafter's Workshop has awesome templates for scrapbooking and art journaling, and there are several face templates.  This is a fun and easy way to put a face on a project.  In the page below, I used the "Edith and Maude" template:


 You can see that I just used the face on the right to create my image.  I outlined the face very lightly with a regular pencil, then went over it with some Derwent Inktense pencils.  I then went back and erased my gray pencil lines, and activated the ink from the Inktense pencils with some water.  I then went over some areas with bit of watercolor paint, and outlined the face with a couple of Gelly Roll pens.   It was pretty fun --- the great thing about an art journal is that you can always cover your mistakes, or leave them be.

So tell me --- how do you feel about drawing?  When was the last time you did any? Are there some of you who do it everyday?  Would you rather do housework than draw?  Does anyone draw using some type of software and a pen tablet?